In most cases, draughts from a uPVC door are caused by worn seals, gaps at the threshold or loose hardware, and replacing seals or fitting draught strips usually fixes the problem. These fixes are quick, affordable and well within most homeowners’ ability. The main exception is anything involving trickle vents, which must stay open, or symptoms like fogged glass and warped frames, which point to a mechanical fault that needs a professional.
Why draught-proofing your uPVC door actually matters
A draughty door does more than make one room chilly. Cold air leaking in forces your heating to work harder, and the Energy Saving Trust confirms that draught proofing stops unwanted cold air entering your home by sealing gaps around doors and windows, cutting heat loss in the process. The trade-off is ventilation. Seal too aggressively, or block the wrong gap, and moisture has nowhere to go, which raises the risk of condensation and mould.
That is why the Energy Saving Trust’s ventilation guidance is clear that trickle vents and other purpose-made ventilation must stay open even as you seal unintended gaps. Door sealing sits within a bigger picture of building performance too, where Approved Document L sets out how U-values are calculated for windows and doors in dwellings.
Before you reach for a sealant gun, keep these priorities in mind:
- Seal gaps that let cold air in by accident, such as worn gaskets or threshold cracks.
- Leave trickle vents, air bricks and any designed ventilation fully open.
- Think of door sealing as one part of wider home insulation, not a standalone fix.
Spotting where the draught is actually coming from
Before fixing anything, you need to know exactly where the cold air is getting in. A few minutes of checking saves you buying the wrong product.
- Walk around the door frame in daylight and look for visible gaps, perished rubber gaskets, or light coming through around the edges.
- Run your fingertips slowly around the frame, hinges, letterbox and keyhole on a cold or windy day to feel for moving air.
- Hold a lit candle or a strip of tissue paper near the frame, threshold and hardware; flickering or movement marks the exact draught point.
- Check the bottom of the door for daylight or a visible gap between the door and the threshold.
- Note the time of day, the wind direction and take a few photos if the draught is hard to pin down, since this detail helps a tradesperson later if you need one.
Common weak points on a uPVC door tend to cluster around the same few areas: the rubber gasket running round the frame, the threshold seal at the bottom, the letterbox, the keyhole and the hinge side, where a door that has dropped slightly no longer compresses the seal evenly.
Fixing uPVC door draughts, step by step
Once you know where the draught is coming from, work through fixes in order of effort, cheapest and easiest first.
Start with the seals. Most uPVC doors use an EPDM rubber gasket or a foam compression seal running around the frame. These perish over time, especially where they are exposed to sun and weather. Pull the old seal out of its groove, clean the channel, and press a matching replacement gasket in firmly, working around the whole frame. A fresh seal alone often restores the original weather-tightness, since perished gaskets are one of the most common causes of draughts through closed doors and windows.
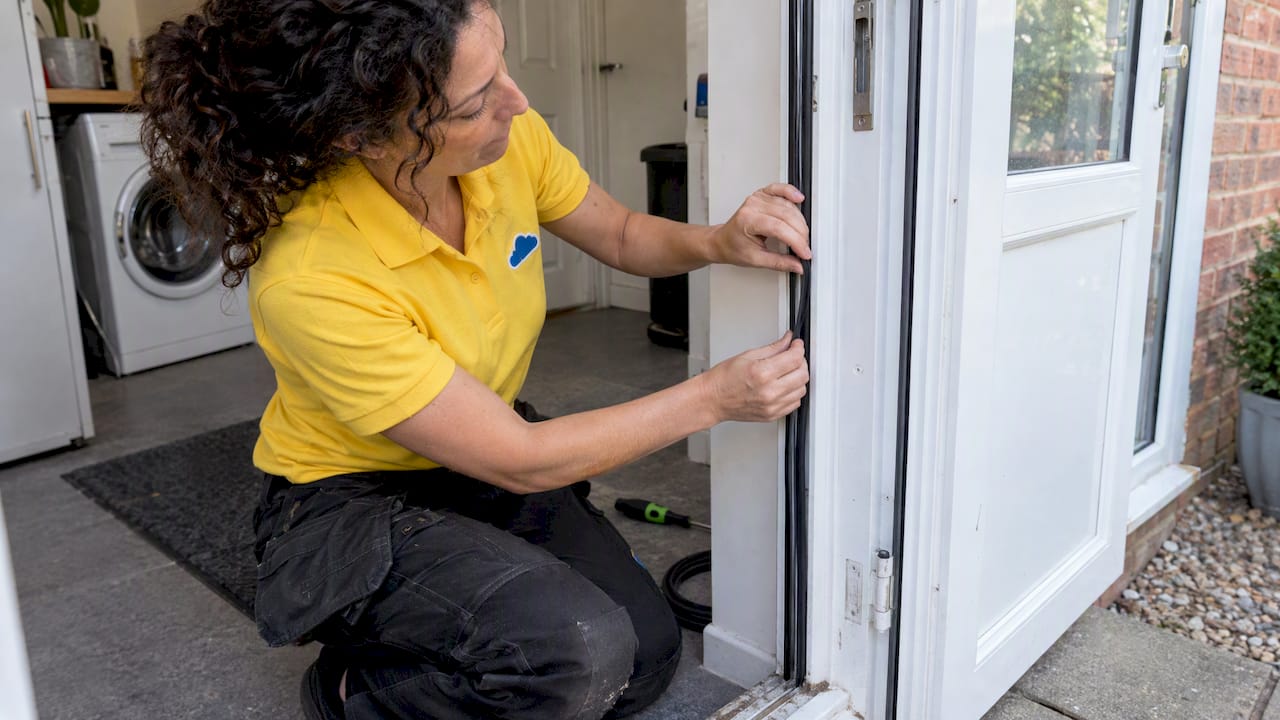
Deal with the threshold next. Gaps at the bottom of the door are usually down to a worn threshold seal or a door that has dropped slightly on its hinges. An adjustable threshold strip, a brush excluder, or a hinged flap excluder can close this gap without needing to replace the whole frame. If the door itself has dropped, our guide to fixing a dropped uPVC door explains how hinge adjustment can correct it before you reach for excluders.
Tackle the letterbox and keyhole. These two small openings let in a surprising amount of cold air. Fit a letterbox brush or flap excluder sized correctly for the opening, and add a simple keyhole cover plate. Measure both openings before you buy, since an ill-fitting excluder will not seal properly.
Check the edges and frame gaps. Where the door meets the frame along the sides, self-adhesive foam strips or compression wiper seals made for uPVC can close small persistent gaps that the main gasket misses.
Finish with micro-adjustments. Many uPVC doors have small striker plate or compression screws that let you tighten how firmly the door presses against the seal, particularly useful as the weather turns colder. Adjust these gradually. Over-tightening strains the hinges and locking mechanism and can make the door harder to operate.
- Replace perished gaskets before buying any add-on excluder.
- Fit threshold and letterbox excluders only after measuring the gap.
- Adjust compression screws in small turns, checking the door still closes easily.
Pro Tip: Never cover or tape over a trickle vent or air brick to cut a draught. Sealing the door should never come at the cost of the ventilation your home relies on.
For more general ideas on materials and methods, our draught-proofing guide for windows covers several techniques that apply equally well to doors, and One Day Doors & Closets’ winterising tips offer a useful seasonal checklist.
When DIY stops being enough
Most draughts respond to the fixes above, but some signs mean it is time to call a professional rather than keep adjusting.
- The draught continues after you have replaced seals, fitted excluders and adjusted the threshold, which usually points to a frame or hardware fault rather than a worn seal.
- You notice fogging or a persistent haze between the panes of glass, a sign the sealed unit itself has failed rather than the draught-proofing around it.
- The frame looks warped, twisted or no longer sits square in the opening.
- The door sticks, drags, or the locking mechanism no longer engages smoothly, which often means the hinges or hardware need professional repair.
Which? lists draughts, leaks and condensation between panes among the clearest signs that a unit needs repair, and notes that many faults are repairable rather than requiring a full replacement. Before any visit, prepare a short note of when the draught is worst, the weather conditions, and any photos you have taken. It also helps to ask directly whether the fix will affect ventilation, so you know the trickle vents and air bricks stay untouched.
What years of door repairs have taught us
We have repaired and replaced double glazed doors over many years, and a handful of causes come up again and again: perished gaskets that have hardened and cracked, doors that have dropped slightly on their hinges, and compression seals that were never adjusted as the seasons changed.
- Many draughts resolve with a straightforward gasket swap or hinge adjustment, no glass work needed.
- Fogging between panes or a warped sash usually means the sealed unit itself needs replacing, not just the seal around it.
- A door that has dropped often just needs hinge recalibration rather than a new frame.
Seal the gaps, not the air your home needs
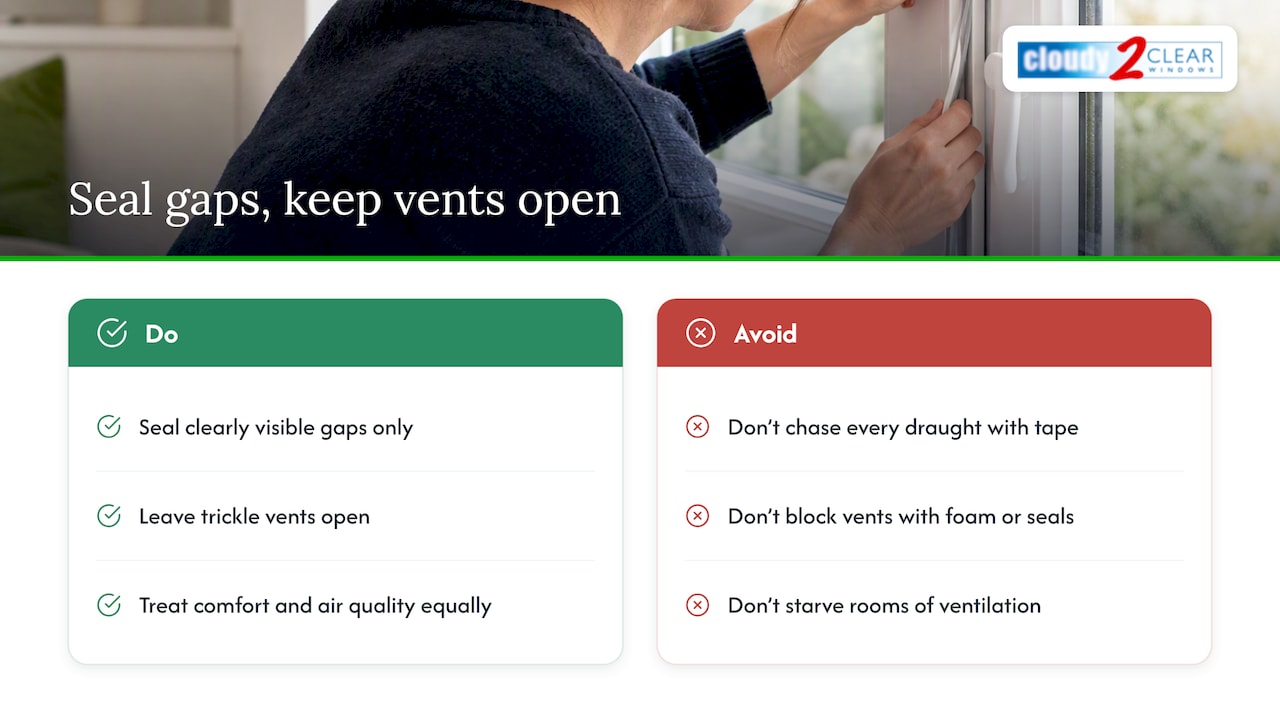
Our honest view is that homeowners often over-correct. Chasing every last draught with tape and foam can starve a room of the ventilation it needs to stay dry and healthy. Seal what is clearly wrong, leave trickle vents alone, and treat occupant comfort and air quality as equally important goals.
If you would rather leave it to a professional
If the DIY route has not fully solved your draught, or you would simply rather not take the door apart yourself, our double glazed door repairs service covers seal replacement, threshold adjustment and hinge recalibration in one visit.

- We repair locks, handles and hinges that affect how tightly your door seals.
- We replace glass only when the unit itself has failed, rather than the whole frame.
- We offer an inspection service for landlords and property managers checking multiple doors at once.
Where the glass itself has misted or cracked, our double glazing replacement service replaces just the pane, keeping disruption and cost down compared with a full new unit. Get in touch through our contact page to arrange a visit.
FAQ
Why are my uPVC doors draughty?
Draughts are most often caused by a perished rubber gasket, a worn threshold seal, or a door that has dropped slightly on its hinges and no longer compresses the seal evenly. Letterboxes and keyholes without covers are also common entry points for cold air.
How do I stop a draught coming through my front door?
Start by replacing any worn gaskets around the frame, then fit a threshold excluder and a letterbox brush or flap if those openings feel draughty. The Energy Saving Trust groups most door draught-proofing into these same four areas: keyhole, letterbox, bottom gap and frame edges.
What is the best draught excluder for a uPVC door?
The right excluder depends on where the gap is: a brush or hinged flap for the threshold, a fitted flap for the letterbox, and a self-adhesive compression seal for gaps along the frame edges. Measuring the gap before buying matters more than brand, since an ill-fitting excluder will not seal properly.
How can I prevent cold air coming through my front door without blocking ventilation?
Seal gaps around the gasket, threshold, letterbox and keyhole, but never cover or tape over a trickle vent or air brick. The Energy Saving Trust’s ventilation guidance is clear that purpose-made ventilation must stay open even as you draught-proof the rest of the door.
When should I call a professional instead of fixing it myself?
Call a professional if the draught continues after replacing seals and fitting excluders, or if you notice fogging between the panes, a warped frame, or a door that sticks or no longer locks smoothly. These point to a unit or hardware fault rather than a simple seal problem.