• USP Logo Icon
    25 Year Guarantee
  • USP Leaf Icon
    Latest ECO Friendly Technology
  • USP Pointer Icon
    National Coverage
Get a FREE quote

Velux Condensation: Ventilate First, Then Check for Seal or Flashing Faults

Condensation on Velux roof windows almost always means the air inside your home is holding more moisture than it can lose to the glass, not a fault with the window itself. The fastest fix is ventilation: crack a window or trickle vent for a few minutes and wipe away any mist or mould straight away. If moisture keeps appearing between the panes, or you see steady dripping rather than a light mist, that points to a failed seal or an installation fault, and it’s time to book a professional inspection.

What causes condensation on Velux windows?

Condensation forms when warm, moisture-heavy air meets a cold surface and can’t hold onto its water vapour any longer. Glass is usually the coldest surface in the room, especially at roof level where heat rises and escapes fastest, so Velux windows often mist up before anything else in the house.

Your daily routine generates more of that moisture than you’d think. An average household of four produces several litres of water vapour a day from cooking, bathing and drying laundry indoors, and in a well-sealed modern home, that moisture has nowhere to go unless you let it out.

A few things tend to make roof windows worse than standard ones:

  • Airtight homes and blocked trickle vents trap warm, moist air near the ceiling, right where roof windows sit.
  • Installation faults, such as missing insulation under the flashing, create localised cold spots that attract condensation.
  • Where the moisture appears tells you what’s wrong: light surface mist usually means humidity, dripping suggests a bigger airflow problem, and moisture trapped between the panes points to a sealed unit failure.

Quick fixes you can try today

Before anything else, tackle the humidity at its source. Most Velux condensation clears up within a week or two once you change a few habits.

  1. Ventilate little and often. Open trickle vents or crack the window briefly a few times daily, ideally with a door or another window open elsewhere to create airflow across the room…
  2. Run extractor fans properly. Switch them on while cooking or showering, and leave them running for a few minutes afterwards, since most of the moisture escapes after you’ve finished, not during.
  3. Bring in a dehumidifier if humidity stays high. Portable compressor models work well in most rooms; desiccant models cope better in cold conservatories or unheated lofts. Aim to keep relative humidity between 40 and 50%.
  4. Build in small daily habits. Wipe the glass and frame each morning, dry laundry outside or in a vented tumble dryer rather than on an indoor rack, and put lids on pans when boiling.
  5. Try short-term insulating measures if you need a stopgap. Anti-condensation paint and insulating film can reduce misting temporarily, though neither solves the underlying humidity problem, and both are cosmetic fixes rather than cures.

Pro Tip: Leave a small gap behind blinds and curtains overnight. A closed blind traps warm air against cold glass and almost guarantees a damp windowsill by morning.

How do you tell condensation from a leak or seal failure?

Not every damp patch on a Velux window is condensation, and treating a leak as a humidity problem wastes time while the damage underneath gets worse. Start by checking where the moisture actually is.

  • Misting confined to the inside of the glass, which clears once you air the room, is ordinary condensation.
  • Persistent moisture or a visible haze trapped between the panes means the sealed unit has failed and needs replacing, not drying out.
  • Damp plaster, a stained reveal, or wet insulation around the frame usually points to a flashing or installation fault rather than humidity.

A simple test used by installers is to check whether the plaster or insulation behind the lining is damp, which signals a thermal bridge or fitting fault, or whether the moisture sits only on the glass surface, which points to humidity in the room. Around one in three homeowner call-outs for “leaking” roof windows turns out to be internal condensation rather than a genuine leak, which is why this check matters before anyone reaches for a sealant gun. If wiping and ventilating for a week makes no difference, or mould keeps returning despite your best efforts, that’s your signal to stop troubleshooting and get the window looked at.

Preventing condensation through better installation

Some condensation problems aren’t behavioural at all. They’re baked into how the window was fitted, and no amount of airing will fix them.

Insulation under the flashing matters more than most homeowners realise. A gap here creates a cold bridge that draws condensation to one spot on the frame, no matter how well ventilated the room is. Trade guidance recommends fitting an insulating collar and correct flashing around the window to close that gap properly.

Roof window insulation and flashing cutaway


The way the internal reveal is finished plays a bigger role than it looks. Boxed-in linings restrict warm air from moving across the glass, while splayed plasterboard reveals let air circulate and keep the surface closer to room temperature. This is often a straightforward retrofit on older installations.

Pro Tip: If your Velux window was fitted more than ten years ago and still has a boxed-in reveal, ask an installer whether re-splaying it is worth doing alongside any other repair, since it’s a small job that pays off for years.

Anything involving under-flashing insulation, resealing, or flashing replacement should go to a certified installer. Warranty-safe insulation typically combines a breathable roofing underlay, an insulating collar, and expanding foam applied correctly to avoid trapping moisture in the roof structure, and getting this wrong yourself can void your warranty.

Routine maintenance that stops problems early

A quick annual check catches most Velux problems before they turn into repairs.

  1. Test the trickle vents open and closed to confirm they’re not painted or dust-sealed shut.
  2. Inspect gaskets and seals for cracking, and check the flashing for lifted edges or gaps.
  3. Look closely at the glass for any haze between the panes, which won’t wipe away and signals seal failure.
  4. Clean mould with a mild bleach or vinegar solution, then dry the area thoroughly to protect the wood frame; if staining keeps returning through fresh paint, that usually means rot underneath rather than surface mould.
  5. Keep a hygrometer in the room and aim for that same 40 to 50% humidity range year-round.

What we see on a typical Velux repair visit

Most of the call-outs we get for “Velux condensation” turn out to be one of three things: a blocked trickle vent, a perished gasket, or missing insulation under the flashing. Vent clearance and gasket replacement are usually same-day jobs. Insulation and flashing corrections take longer, since they involve working from the roof side.

On a diagnosis visit, we check the trickle vent function, run a hand around the frame for cold spots, inspect the flashing from outside where access allows, and look for any haze between the panes that would point to a failed sealed unit rather than a surface issue.

Cloudy2Clear Windows has been repairing and replacing double glazing since 2005, with a specific focus on Velux window repairs across both homes and commercial buildings. If you’re not sure whether your window needs a repair or a full replacement, that’s exactly what a diagnosis visit is for.

Our take: ventilation first, but don’t stop there

Most advice on Velux condensation stops at “open a window,” and while that’s genuinely the right first move, it lets too many homeowners assume every damp pane is their fault. It isn’t always. We’ve seen plenty of cases where someone spent months airing rooms and running dehumidifiers against a problem that was actually a missing insulation collar or a failed seal that no amount of ventilation was ever going to fix.

Our take: ventilation first, but don't stop there — overview diagram


The conventional advice also underplays how much modern, airtight homes change the picture. A house built or renovated to today’s insulation standards behaves differently to a draughty older property, and ventilation habits that worked for your parents’ generation may not be enough on their own now.

Our honest priority order: fix your daily habits first, since they’re free and solve most cases within days. Then check for patterns, cold spots, or between-pane haze that habits alone won’t touch. Only then think about whether an installer needs to get involved, and don’t wait months to find out.

Get a warranty-safe inspection from Cloudy2Clear Windows

Cloudy2Clear Windows gives you a fixed-scope alternative to guesswork: rather than trying insulating film, paint, and vent adjustments one by one, a single diagnosis visit tells you exactly whether you’re dealing with humidity, a failed seal, or a flashing fault, and what it will cost to fix.

Cloudy2clearwindows


Call us if you’re seeing mould return despite regular airing, moisture trapped between the panes, or damp plaster around the frame that suggests a flashing leak. On a visit, we check trickle vent function, inspect visible seals and flashing, and confirm whether you need a glass-only replacement or a smaller repair. Any work we recommend under flashing or around the sealed unit is carried out in a way that protects your existing warranty. Cloudy2Clear Windows operates through regional branches, including Milton Keynes, so book a visit through your nearest branch or get in touch via our contact page to arrange a quote.

Sources

For manufacturer advice, see VELUX’s condensation guidance. For humidity control at home, see our step-by-step condensation workflow.

FAQ

How do I stop my skylight from dripping condensation?

If dripping continues after a week of consistent airing, the cause is likely a seal or installation fault rather than humidity.

What are some common problems with Velux windows?

The most common issues are blocked trickle vents, worn gaskets, and thermal bridging from missing insulation under the flashing. Between-pane haze or persistent damp plaster around the frame usually points to a failed sealed unit rather than a general humidity problem.

Can Velux windows be resealed?

Perished gaskets around the frame can be replaced, but a failed sealed glazing unit itself can’t be resealed and needs replacing. A Cloudy2Clear diagnosis visit can confirm which repair applies to your window.

Should you leave Velux vents open?

Yes, keeping trickle vents open is one of the simplest ways to reduce condensation, since it lets moist air escape before it settles on the cold glass. Close them only briefly during extreme weather, and reopen them as soon as conditions ease.

Avoid WD-40: Quick Tilt and Turn Window Checks for UK Homeowners

Most tilt and turn window problems come down to a mishandling selector needing a reset, a misaligned hinge, or dry, grimy locking points. These fix in minutes with no tools beyond an Allen key. If the handle spins freely with no resistance, or a sash sags visibly on its hinges, stop trying to force it. That points to gearbox or hinge failure, and Cloudy2Clear Windows can inspect and repair it properly.

Quick troubleshooting checklist for tilt and turn window issues

Before reaching for a screwdriver, run through this sixty-second check. It sorts the genuine emergencies from the five-minute fixes.

  • Confirm the sash is fully closed and square in the frame before touching the handle.
  • Try the mishandling selector reset (the small button or catch near the handle spindle).
  • Note whether the handle feels stiff, jammed solid, or spins with no resistance at all.
  • Check hinge tracks and corners for grit, leaves, or old paint chips.
  • Look for blocked weep holes along the bottom of the frame.
  • Apply a small amount of the correct lubricant to locking points and test again.

A free-spinning handle is the one sign on this list that usually means a broken part rather than a simple jam, according to independent troubleshooting guides.

Step-by-step fixes for common tilt and turn window symptoms

Work through these in order. Each one takes under fifteen minutes and needs no specialist tools.

  1. Stuck in tilt or half-turn. Close the sash fully, then locate the mishandling selector, usually a small lever or button beside the spindle. Press it while gently moving the handle back to the vertical (locked) position. Do not force the handle if it resists; a jammed selector released under pressure can bend the linkage.
  2. Jammed or stiff handle. Remove the handle’s decorative cap, check the two fixing screws haven’t loosened, then apply grease to the spindle and cam. If it’s still tight, the cam compression may need easing slightly, which the MACO maintenance and adjustment instructions cover in detail.
  3. Free-spinning handle. Turn the handle slowly and watch whether the espagnolette bolts inside the frame move at all. If they don’t move, the gearbox or spindle has failed internally, not the handle itself.
  4. Sagging or misaligned sash. Check the reveal, the gap between sash and frame, along all four sides. An uneven gap suggests the hinges need adjusting rather than replacing.

Pro Tip: Photograph the gap at each corner with a coin for scale before adjusting anything. It gives you a baseline to check whether your fix actually worked.

Sash alignment and hinge adjustment: what’s safe to try

Tilt and turn hinges have two or three adjustment points: a height screw, a lateral screw, and sometimes a scissor-stay tension screw. Most use 4mm or 5mm Allen keys, though some German-pattern hinges use Torx bits.

  • Adjust in quarter turns only, then close the sash and check the reveal before turning further.
  • Work towards an even gap all round rather than a perfect number.
  • Never lower the sash past any notch marked on the hinge arm.
  • Stop immediately if the sash feels heavier or looser than before you started.

Locking mechanism faults account for a notable share of window repair callouts across UK homes, according to Glass and Glazing Federation technical guidance, and alignment is one of the most common culprits. The Maco standard fittings manual is explicit that incorrect bayonet bolt positioning during adjustment can let a sash drop out entirely. Full sash removal, or re-hinging a heavy triple-glazed unit, is a job for trained personnel, not a Saturday afternoon.

What lubricant should you use on tilt and turn windows?

Never use WD-40, household oil, or rust remover on locking cams and espagnolette strips. They cut through initial stiffness but attract dust and grit, which then grinds against the metal every time you operate the handle.

  • Use lubrication grease or technical Vaseline on the gearbox and locking cams.
  • Use PTFE or silicone spray on sliding tracks and scissor stays.
  • Apply sparingly, then operate the handle several times to work it in, then wipe away excess.
  • Check every six months; lubricate fully once a year as routine tilt and turn window maintenance.

Pro Tip: A little grease goes further than you’d think. Overdoing it just gives dust somewhere new to stick.

How to tell a handle problem from a gearbox failure

A stiff handle is nearly always fixable. A gearbox failure rarely is, not without opening up the frame.

Check the two visible screws under the handle’s decorative collar first; loose screws cause wobble that mimics gearbox wear. If the spindle looks chewed or rounded where it meets the handle, that’s a worn spindle rather than a gearbox fault, and it’s a cheap swap.

  • Free-spinning handle with no resistance and no bolt movement: gearbox failure, needs sash access.
  • Chewed or rounded spindle: replace the spindle, often under £20 in parts.
  • Visible corrosion on the gearbox casing or a snapped scissor stay: stop and call a professional.

Photographing the handle, spindle, and any visible gearbox housing before calling for help speeds up diagnosis considerably, since a technician can often quote from images alone.

When should you call a professional for tilt and turn window problems?

Certain faults simply aren’t worth attempting yourself, whatever your DIY confidence.

  • A handle that spins freely with zero resistance from the locking bolts.
  • A sash that has visibly dropped or won’t sit square however you adjust the hinges.
  • A snapped or bent scissor stay, the arm that controls the tilt function.
  • Perished seals letting in draughts or water despite gasket adjustment.
  • Cracked glass or a failed double-glazed unit showing internal misting.

Simple lubrication or a selector reset costs next to nothing and takes under an hour, whereas professional call-outs for hinge or gearbox replacement typically run into a higher labour bracket once parts are involved. Forcing a jammed handle or a stuck gearbox nearly always turns a straightforward repair into a full hardware replacement, which costs considerably more than calling someone early.

How often should you maintain tilt and turn windows?

A short, consistent routine beats an annual scramble.

  1. Monthly: wipe hinge tracks, check weep holes aren’t blocked, and glance at the reveal for uneven gaps.
  2. Every six to twelve months: lubricate all locking points, gaskets, and hinge pivots properly.
  3. Seasonally: ease cam compression slightly for winter (better seal against cold) and loosen it a touch for summer.
  4. Annually: run the paper test. Close the sash on a strip of paper at several points; if it slides out easily, compression has dropped and needs adjusting.

Cleaning debris from hinge channels and lubricating locking points on this kind of schedule prevents the majority of common failures, making it the cheapest maintenance habit a homeowner can build. If draughts persist despite this, it’s worth reading our guide on fixing window leaks or understanding why window seals fail in the first place.

Cloudy2Clear Windows: repairing hardware since 2005

Cloudy2Clear Windows has repaired and replaced double glazing, locks, hinges, and handles across residential and commercial properties since 2005. Our engineers see the same faults repeatedly: worn gearboxes, dropped sashes, and DIY lubrication gone wrong with the wrong products.

A typical inspection checks hinge alignment, gearbox action, cam compression, and seal condition, then repairs or replaces only what’s actually failed. We don’t push full hardware replacement when a spindle swap or hinge adjustment will do the job properly.

Four checks in a window hardware inspection

Our honest take on DIY versus calling a technician

We’d always rather you try the selector reset and a proper lubrication first; most calls we get could have been solved that way. Where homeowners go wrong is forcing a stuck handle or removing a sash without checking the notch markings, which turns a small job into a hinge replacement.

— Cloudy2Clear

Book a tilt and turn window repair with Cloudy2Clear Windows

If the checklist above hasn’t freed things up, or you’re staring at a free-spinning handle and a sash that won’t sit right, that’s exactly where Cloudy2Clear Windows steps in. Unlike a generic handyman callout, our engineers work on hardware like this daily, so diagnosis is quick and the first visit is usually the only one you need.

Cloudy2clearwindows


Get in touch through our lock, hinge and handle repair service with a short description of the fault, a couple of photos of the handle or hinge, and your preferred appointment times. If your seals or glazing are the real culprit rather than the hardware, our glass and double glazing replacement team can take it from there instead. For readers weighing up a full DIY replacement, it’s also worth reading a partner perspective on the pitfalls of DIY door and window replacement before committing tools and time. We operate Monday to Friday, 8:30am to 6:30pm, and if you’re near Oxford, our Oxford branch page has local booking details ready to go.

Sources

For technical detail beyond this guide, the MACO maintenance and adjustment instructions cover fitting-by-fitting lubrication and adjustment steps in full. The Maco standard fittings manual adds sash-removal safety warnings, and the LockLatch troubleshooting guide explains the mishandling selector reset in more depth, plus a useful note on secure ventilation gaps.

FAQ

What are the disadvantages of tilt and turn windows?

Their multi-point locking gearbox has more moving parts than a standard casement hinge, so it’s more prone to wear, and repairs often need sash access rather than a simple external fix.

What are the most common problems with uPVC tilt and turn windows?

Stuck selectors, stiff or free-spinning handles, sagging sashes, and draughts from compressed or perished gaskets account for the vast majority of faults reported.

How much does it cost to replace a tilt and turn window?

Simple lubrication or a selector reset costs very little and takes under an hour, while professional hinge or gearbox replacement involves parts and labour that Cloudy2Clear Windows can quote after seeing photos of the fault.

Can you adjust a tilt and turn window yourself?

Yes, hinge height, lateral position, and cam compression can be adjusted with an Allen key in small increments, but sash removal and heavy lifting should be left to trained personnel due to drop-out risk.

Save £85–£195 a Year With Argon Filled Double Glazing for UK Homes

Argon-filled double glazing improves insulation by roughly 15 to 30% over air-filled units, pushing centre-pane U-values down to around 1.1 to 1.4 W/m²K in typical builds. For most UK homes, that modest premium over air-filled units pays for itself in lower heating bills and less condensation, provided the sealed unit is well made and properly installed. The rest of this guide covers the evidence, the costs, and what to check before you buy.

What is argon-filled double glazing?

Argon-filled double glazing is a sealed insulating glass unit where the space between the two panes, the cavity, is filled with argon gas instead of ordinary air. Argon is inert, colourless, and roughly 35% denser than air, which slows the transfer of heat through the cavity far more effectively than air alone.

Manufacturers fill units with argon during production, injecting the gas as the panes are sealed together with a spacer bar around the edge. This is why the process is described as “factory-filled” rather than something an installer does on-site. Once sealed, the unit is designed to hold that gas for decades.

A few practical points worth knowing:

  • Cavity widths typically range from 12mm to 20mm, with 16mm being a common sweet spot for argon performance.
  • Older double glazing, particularly units installed before the mid-2000s, is often air-filled rather than argon-filled.
  • The gas fill works alongside a low-emissivity (Low-E) coating on the glass, and the two together do most of the thermal work.
  • Argon-filled units look identical to air-filled ones from the outside. You cannot tell by looking at a window whether it has argon or air inside.

If you are checking existing windows in your home, the Cloudy2Clear guide to window energy efficiency walks through what to look for.

How does argon improve insulation?

Argon conducts heat more slowly than air. This single physical property is the entire reason it ends up in your window cavity, and it is worth understanding why it matters so much for a room that feels cold in winter.

Air constantly circulates within a sealed cavity through convection, carrying heat from the warm inner pane to the cold outer pane. Argon, being heavier and less prone to convective movement, dampens that circulation. A comparative study using experimental testing and CFD modelling found that argon-filled cavities consistently produced lower U-values and better thermal resistance than air-filled units across a range of cavity widths, with the improvement most pronounced at cavity widths of 12mm to 20mm, the range most UK manufacturers already use.

Argon’s edge: Switching from air to argon in a standard cavity typically cuts the centre-pane U-value by 0.2 to 0.6 W/m²K, translating to a 15 to 30% improvement in heat retention depending on coatings and spacer type.


To put real numbers on this, a common 4-16-4 configuration (4mm glass, 16mm cavity, 4mm glass) with a Low-E coating and argon fill typically reaches a centre-pane U-value of around 1.1 W/m²K, according to EN 673-based calculator examples. Higher-specification units with better coatings can nudge that down towards 1.0 W/m²K. The same build filled with plain air would sit noticeably higher, often above 1.4 W/m²K, because it loses the argon effect entirely.

None of this happens in isolation. The spacer bar, coating quality, and cavity width all interact with the gas fill to produce the final figure, which is why two argon-filled windows from different manufacturers can still perform quite differently.

Factors affecting double glazing insulation

What are the main benefits of argon gas windows?

Better insulation is the headline benefit, but it shows up in your home in several distinct ways beyond the number on a spec sheet.

  • Lower heating bills. Energy Saving Trust benchmarks suggest that upgrading a single-glazed semi-detached home to A-rated double glazing can save roughly £85 to £195 a year, depending on your region and starting point. Argon-filled units, being the standard for A-rated glazing, deliver most of that saving.
  • Reduced condensation. A warmer inner pane surface means moisture in room air is less likely to hit dew point and condense on the glass. This matters for mould risk around window reveals, particularly in bathrooms and bedrooms.
  • Better comfort near windows. Cold spots and draughts near glazing reduce when the inner pane runs closer to room temperature.
  • Acoustic improvement. While argon’s soundproofing effect is secondary to its thermal role, the denser gas and sealed unit construction do reduce airborne noise transmission compared with a poorly sealed air-filled equivalent.

Pro Tip: Argon-filled units still need adequate trickle ventilation to meet Building Regulations Part F and prevent damp buildup. Do not seal a room completely just because the glazing is more efficient.

What does argon-filled double glazing cost?

The argon premium itself is small. Fitting a room, or a whole house, is where the bigger cost decisions sit.

  1. The gas premium is minor. Argon typically adds a small percentage to the manufacturing cost of a sealed unit compared with an air-filled equivalent, often a modest amount per window rather than a significant jump in overall project cost.
  2. Payback depends on your baseline. If you are replacing single glazing entirely, the Energy Saving Trust’s £85 to £195 annual saving range for a typical semi-detached home gives a payback period of several years once you factor in full installation costs, not just the gas fill.
  3. Frame material and installation quality matter more than the gas. A well-fitted uPVC or aluminium frame with a proper Low-E argon unit will outperform a cheaply installed equivalent every time, regardless of what gas sits in the cavity.
  4. VAT and grants vary by project. Standard installations carry standard VAT, though some energy efficiency schemes offer support depending on eligibility, so check current guidance before budgeting.

For a fuller cost breakdown across window types, the guide to investing in energy efficient windows is a useful next read.

How long does argon last in a sealed unit?

Argon does not vanish overnight. Well-manufactured units typically leak gas at a rate of less than 1% per year, meaning a properly sealed unit can retain useful thermal performance for decades.

  • Misting or fogging between the panes is the clearest sign of a failed seal, not a gradual argon leak you would notice day to day.
  • Once a seal fails, refilling the unit with fresh argon is rarely practical or cost-effective. Replacing the sealed unit is normally the correct fix.
  • Look for FENSA certification and BFRC energy ratings when buying, and check what warranty terms cover seal failure specifically, not just frame defects.
  • Installation quality and spacer system design often matter as much as the gas fill itself for long-term performance, so ask what spacer bar is used before you commit.

Argon vs krypton vs triple glazing: which should you choose?

Argon is the standard choice for good reason, but it is not the only option, and knowing when to look elsewhere saves you money.

  • Argon vs air: Argon wins comfortably in any standard cavity. There is little argument for choosing air-filled units in new installations today.
  • Argon vs krypton: Krypton conducts heat even more slowly than argon, but it only shows a meaningful advantage in narrow cavities, typically under 10mm, and it costs considerably more to produce. For the 12 to 20mm cavities most UK homes use, argon delivers better value for money.
  • Triple glazing: Worth considering for north-facing rooms, homes near busy roads, or anyone chasing the lowest possible U-values, but it adds weight, cost, and frame strain that is unnecessary for most standard rooms.
  • Cavity width and coatings still decide the outcome. A well-specified Low-E coating with a warm-edge spacer and the right cavity width can shift performance as much as the gas choice does, so treat gas fill as one part of a bigger specification, not the whole answer. For a broader comparison of options, see how to select glazing for energy efficiency.

Should you retrofit or replace your windows?

Deciding between retrofitting and full replacement comes down to the condition of your existing frames and seals, not just the glass.

  1. Inspect for misting first. Fogged panes mean the seal has failed and the unit needs replacing, not topping up.
  2. Check the frame condition. Sound, undamaged frames can often accept new argon-filled units without full replacement.
  3. Consider age. Units older than 15 to 20 years are more likely to be air-filled and past their efficient prime anyway.
  4. Ask your installer these questions: Can they show U-value certification for the specific unit? Are they FENSA or equivalent certified? Can you see a sample unit? What does the warranty cover, and for how long? What cavity width and spacer system will they use?

Pro Tip: A retrofit argon injection into an existing sealed unit is sometimes offered, but effectiveness varies widely. Get a professional assessment of your seals and frame condition before paying for one.

For a step-by-step walkthrough, see the guide to energy efficient window upgrades.

Cloudy2Clear Windows: experience and proof points

Cloudy2Clear Windows has installed, replaced, and repaired double glazing across the private and commercial sectors since 2005. That means two decades of fitting the exact sealed units this article describes, from standard residential replacements to housing association compliance jobs.

Services relevant to argon-filled glazing include glass-only replacement for misted or failed units, energy-efficient and soundproofing glass upgrades, and inspection services for commercial and housing association properties.

When is argon-filled double glazing the pragmatic choice?

When is argon-filled double glazing the pragmatic choice? — overview diagram


Argon-filled glazing makes the most sense for anyone still living with single glazing, ageing air-filled units, or windows that mist between the panes. Property managers overseeing multiple units get the clearest return, since even modest per-window savings scale quickly across a block or estate.

The mistake we see most often is homeowners chasing the cheapest quote rather than checking the certification behind it. A properly specified argon unit with a decent spacer system and a genuine FENSA-registered installer will outperform a bargain unit with vague paperwork, every time. Quality of manufacture and installation matters more than squeezing the last percentage point out of gas choice.

Get your windows assessed by Cloudy2Clear Windows

Cloudy2Clear Windows offers something most full-frame replacement quotes do not: a glass-only repair option, so if your argon-filled unit has failed and the frame is still sound, you are not paying to replace what does not need replacing.

Cloudy2clearwindows


Whether you have a single misted pane or a whole property’s worth of ageing units, our teams handle glass-only replacement, energy-efficient upgrades, and compliance inspections for homeowners, businesses, and housing associations alike. If you are near Oxford, Milton Keynes, Watford, Leicester, Bury St Edmunds, or Norwich, check your nearest Cloudy2Clear branch page for local service details, or head straight to our window pane and double glazing glass replacement page to see how the process works. Property managers with commercial stock can also explore our commercial window replacement and glass repair service. Book an inspection today and find out whether your existing frames can take a new argon-filled unit without full replacement.

Sources

FAQ

Is argon-filled double glazing worth it?

Yes, for most homes. The 15 to 30% improvement in thermal performance over air-filled units usually justifies the small extra manufacturing cost, especially when replacing single glazing.

Is argon in windows worth the extra cost specifically?

The argon fill itself adds only a modest amount to a unit’s price, so the payback period is short compared with the annual savings of £85 to £195 that upgraded glazing can deliver.

Are all double glazing units argon filled?

No. Many older units, particularly those installed before the mid-2000s, are air-filled, and some budget new units still use air rather than argon, so it is worth confirming the specification before buying.

Why use argon in double glazing rather than air?

Argon conducts heat more slowly than air and dampens convective heat loss within the cavity, giving a measurably lower U-value and better real-world insulation, as shown in experimental and CFD testing.

What causes argon gas loss in windows, and how would I notice it?

Argon gas loss happens gradually through seal degradation, typically under 1% per year in well-made units. The visible symptom is not gas loss itself but eventual seal failure, which shows up as misting or fogging between the panes.

Demand Parts 2, 3 and 6 Evidence Under BS EN 1279 for UK Specifiers

BS EN 1279 is the mandatory multi-part standard governing insulating glass units sold in the UK, covering design, moisture and gas testing, edge-seal durability, conformity evaluation, and factory production control across Parts 1 to 6. Before accepting any sealed unit, insist on current Part 2, Part 3, and Part 6 test certificates plus a system description that matches the exact configuration you’re buying. Anything less leaves you exposed to premature failures and compliance gaps.

At a glance: the six parts of BS EN 1279 and why each matters in practice

BS EN 1279 is published as a family of six linked documents, and each governs a different stage of an insulating glass unit’s life, from design through to the factory floor. Knowing which part covers which task saves a lot of confusion when a supplier waves a single certificate and calls it “full compliance.” The standard’s structure, as recorded in the official BSI reference, breaks down like this:

  • Part 1 covers generalities, tolerances, and visual quality rules. Your system description should specify exact glass thicknesses, spacer bar dimensions, and cavity widths, not vague ranges.
  • Part 2 sets the long-term moisture penetration test. This is the clearest indicator of whether a unit will stay clear for its expected service life.
  • Part 3 governs gas leakage and concentration tolerances for argon or krypton-filled units. Skip this check on a gas-filled order and you’re trusting the supplier’s word alone.
  • Part 4 covers edge seal component tests, including inserts, sealants, and spacer materials, under accelerated ageing and durability conditions.
  • Part 5 deals with evaluation of conformity: how a manufacturer formally declares that production matches the tested design.
  • Part 6 introduces factory production control (FPC) and periodic testing, the ongoing discipline that stops a one-off test result from becoming a hollow promise.

A unit that passed Part 2 testing five years ago tells you nothing about a batch made last month unless Part 6 records show continued periodic checks.

Testing and periodic checks: how Parts 2, 3 and 6 are tested and what the results mean

Moisture penetration testing under Part 2 exposes units to cyclical climate chambers, tracking whether the desiccant and edge seal keep water vapour out over extended periods. A failed result signals the moisture penetration index has been breached, which almost always points to a compromised seal or an underperforming desiccant, and predicts early internal misting.

Gas retention testing under Part 3 measures how much argon or krypton a unit loses over time, checked against defined concentration tolerances. Units that leak gas too quickly lose their thermal advantage years ahead of schedule, even though they may look fine from the outside.

  1. Initial type testing proves the design works before production starts.
  2. Periodic testing under Part 6 repeats key checks at set intervals, commonly on a regular schedule such as annual or every couple of years depending on the certification scheme, to confirm ongoing production quality.
  3. Re-testing after component change is triggered whenever a manufacturer swaps sealant, spacer, or glass supplier, since the original system description no longer applies.

Pro Tip: Ask whether the periodic test was carried out by an accredited third-party laboratory rather than the manufacturer’s own quality team. Independent verification is what separates a genuine certificate from a marketing claim.

BFRC now offers Part 6 periodic testing directly, and its guidance to licence holders makes clear that documentary evidence for Parts 2 and 3 must be current, not historic.

Compliance, marking and building regulations in the UK

Since 2013, manufacturers have had to declare the performance of their products under the Construction Products Regulation, which is what sits behind CE marking and its UK equivalent, UKCA. Compliance with BS EN 1279 isn’t optional background reading here; it’s the technical basis that supports the declaration itself.

  • Parts 2, 3, and 4 provide the evidence a manufacturer needs before making a lawful declaration of performance.
  • Part 6’s factory production control obligations are what keep that declaration valid over time, not just at the point of a single test.
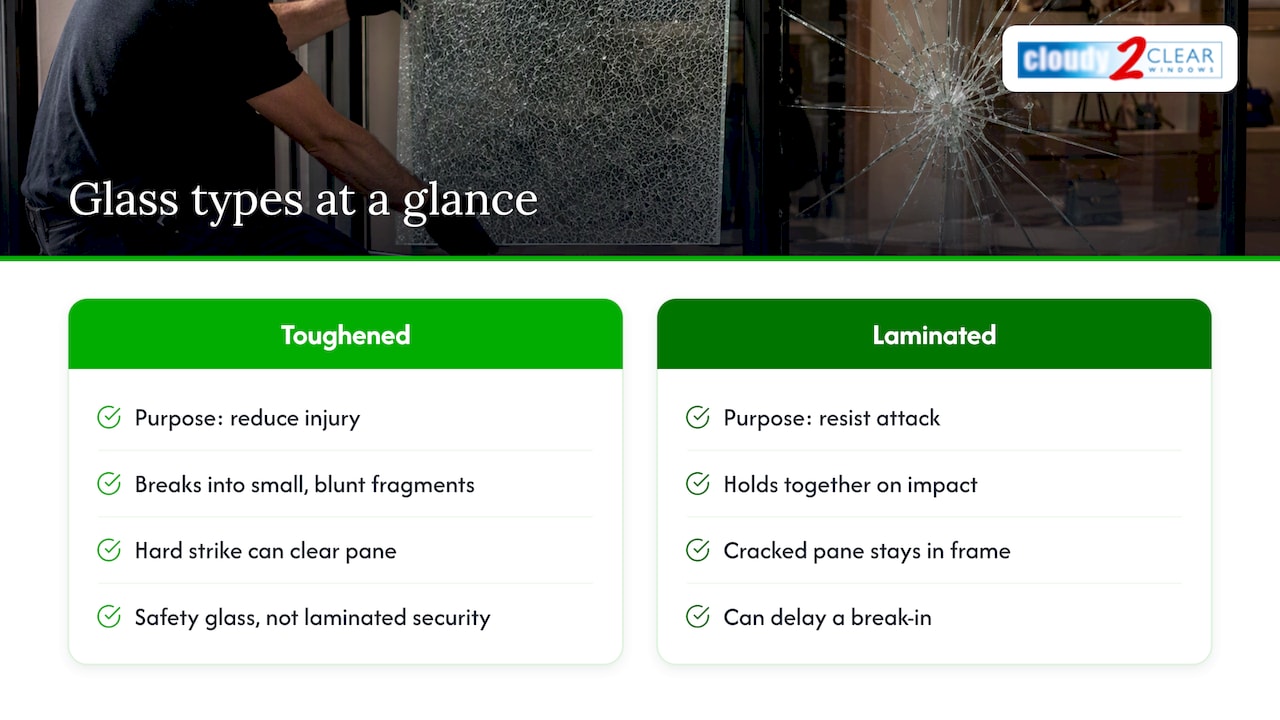
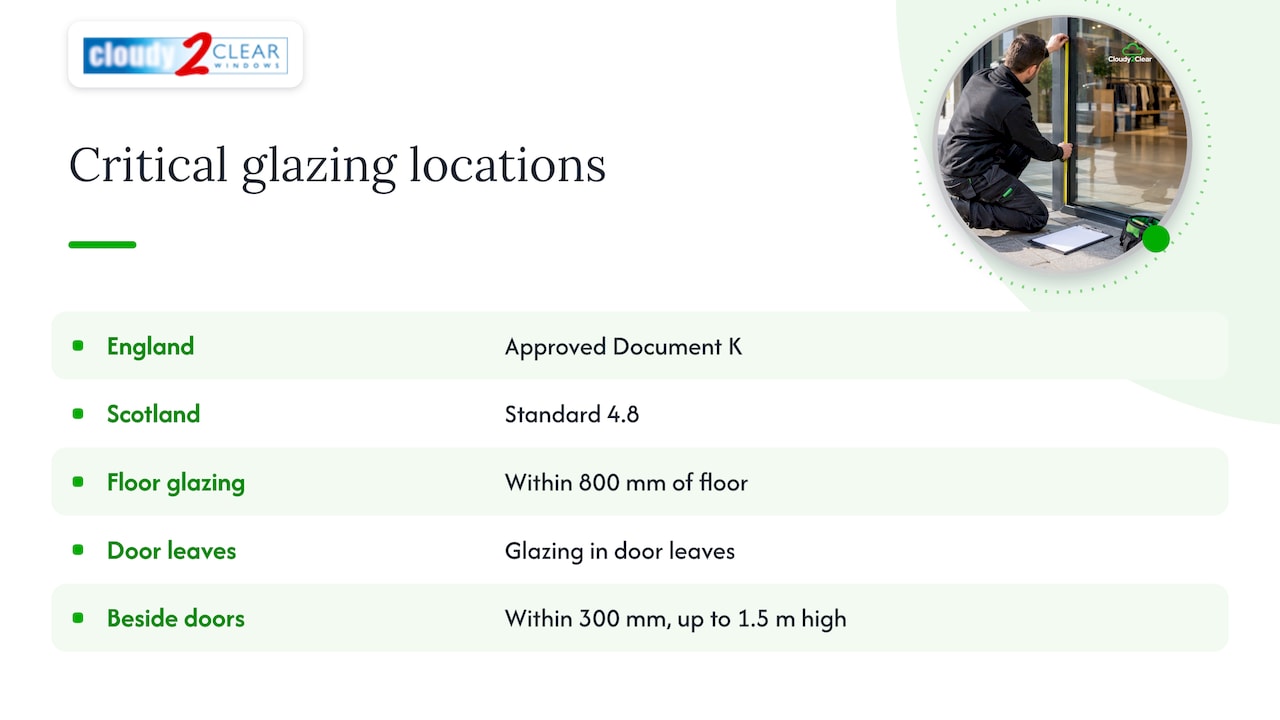
  • Building Regulations bring a separate but connected layer: Approved Document N governs glazing safety (Requirements N1 and N2), covering critical locations and manifestation, while thermal performance sits under Part L and is assessed at the whole-window level, not the IGU alone.

That last distinction trips people up constantly. BS EN 1279 certifies the sealed unit; it does not certify the finished window’s U-value, which depends on the frame and glazing combination together.

What to ask for: supplier documentary evidence and the procurement checklist

Before you sign off on a delivery, get the paperwork in hand, not promised. A verbal assurance of “BS EN 1279 compliant” means nothing without the following.

  1. A system description matching your exact unit. Glass type, spacer width, and sealant brand must all correspond to what’s arriving on site.
  2. Initial type test certificates covering Parts 2, 3 (for gas-filled units), and 4.
  3. Periodic test reports and FPC audit records under Part 6, dated within the current certification cycle.
  4. A UKCA or CE declaration of performance, with traceable contact details for the testing laboratory.

Pro Tip: If a supplier can’t produce dated, current certificates on request, treat that as a red flag rather than an oversight. Trade guidance consistently warns that BS EN 1279 compliance is component and configuration specific, so a certificate for a different spacer or sealant doesn’t cover your order.

Common failure modes and what inspections reveal

Most IGU failures give warning signs long before a unit needs full replacement, provided someone knows what to look for on site.

  • Internal condensation or misting almost always points to moisture ingress through a failed seal, or a desiccant that’s reached saturation.
  • Visible edge-seal degradation, including cracking, shrinkage, or disbonding at the corners, is an early indicator that the Part 4 durability margin has been exhausted.
  • Gradual thermal performance loss happens as gas fill depletes; it’s invisible to the eye but shows up as rising energy bills or cold spots near the glass.
  • Simple site checks (a torch held at an angle to spot seal cracking, a check for uneven condensation patterns) can flag a problem, but confirming the cause reliably means laboratory-grade testing.

Distinguishing a repairable frame issue from a failed sealed unit early saves both money and disruption.

How Cloudy2Clear Windows applies BS EN 1279 in the field

On every job, we match the supplier’s system description and certificate part numbers to the actual glass, spacer, and seal combination installed, then log that certificate against the job number for traceability. Any component substitution, even a change of sealant supplier, gets flagged as a non-conforming change requiring re-validation before we proceed.

  • Certificates and system descriptions are checked before a unit is accepted, not after installation.
  • Periodic test schedules are tracked so an out-of-date certificate never slips through unnoticed.
  • Supplier non-compliance is challenged directly, with replacement units sourced rather than installing anything unverified.
  • IGU checks are built into standard handover documentation for commercial and housing association clients.

What this means for UK specifiers right now

The most procurement-critical requirements haven’t changed: demand Parts 2, 3, and 6 evidence, matched to the exact system description, before any sealed unit reaches site. Documentary proof and third-party periodic testing matter more than a supplier’s reputation. Use the checklist above every time you onboard a new supplier, no exceptions.

How Cloudy2Clear Windows can help with IGU compliance and replacement

Cloudy2Clear Windows gives you a documented, certificate-checked route to compliant sealed units, without the guesswork of taking a supplier’s word for it. Where other routes leave you chasing paperwork after installation, our teams verify system descriptions and test certificates against the actual units fitted, and we handle glass-only replacement when a unit has already failed.


We cover commercial premises and housing association stock, alongside residential glazing, with branches including Milton Keynes and Watford. If a unit on your site shows misting, seal cracking, or a supplier’s certificate has expired, book an inspection through our contact page and we’ll check the documentary evidence and the glass itself before recommending repair or replacement.

Sources

FAQ

What is BS EN 1279?

BS EN 1279 is the British and European standard for insulating glass units, published in six parts covering design, moisture and gas testing, edge-seal durability, conformity, and factory production control.

What is the typical thickness of double glazing in the UK?

Most UK double glazing units use a cavity thickness specified by the supplier’s system description, which should always be checked rather than assumed.

What are the requirements for safety glass in the UK?

Safety glass requirements in critical locations, such as doors and low-level glazing, are set by Approved Document N under Building Regulations, which sits alongside, not instead of, BS EN 1279 compliance for the sealed unit itself.

How often does BS EN 1279 periodic testing need to happen?

Periodic testing under Part 6 typically runs on a regular cycle depending on the certification scheme, with additional re-testing triggered whenever a manufacturer changes a key component like sealant or spacer material.

Does BS EN 1279 cover a window’s overall energy efficiency?

No. BS EN 1279 certifies the sealed unit’s manufacturing quality and durability; whole-window thermal performance is assessed separately under Part L, taking the frame and glazing combination together.

Stop 80% of Conservatory Heat: UK checklist before a roof upgrade

Shade the glazing before midday, ventilate during the cool hours, add fans or correctly sized air conditioning only if you still cannot use the room, and treat a roof or glazing upgrade as a last resort rather than a first move. Each step typically knocks a few degrees off peak heat, but shading alone often makes the biggest difference. If the room stays unusable after trying all three, Cloudy2Clear Windows can inspect the roof and glazing and advise on realistic options.

Why does my conservatory get so hot?

Roof glazing does most of the damage. In many conservatories, up to 80% of summer solar heat enters through the roof rather than the side windows, which is why fixing the walls alone rarely solves the problem.

Once that heat is inside, it does not just disappear when the sun moves round. Dark floors, heavy sofas and thick curtains soak it up during the day and release it slowly in the evening, which is why a conservatory can still feel stuffy at 9pm even with every window open.

Orientation matters more than most homeowners realise. A south or west-facing room takes the strongest, longest exposure, and a conservatory projecting beyond a certain distance from the house may lose the shade the main building would otherwise provide during peak summer months.

Two technical terms are worth knowing before you start fixing anything:

  • U-value: measures how much heat escapes through glass or roofing. Lower is better for keeping warmth in during winter.
  • Solar control coating: a thin layer on the glass that reflects some solar energy before it enters, reducing heat gain without needing tinted or dark glass.

Quick fixes to try this week

Start with the roof, not the walls. Since most heat comes through the roof glazing, that is where shading pays off fastest.

  1. Fit or close roof blinds early. Pleated or thermal-lined roof blinds block heat at the source. Closing them before the heat of the day builds works far better than trying to cool a room that has already heated up.
  2. Add solar-control window film. Film applied to glass reflects a portion of incoming solar energy and typically lasts several years, though it suits flat glazed panels better than curved or polycarbonate roofs, where fitting is trickier and less reliable.
  3. Install external shading. Awnings, pergolas or sail shades stop heat reaching the glass in the first place, which tends to outperform internal blinds alone because the glazing itself never gets hot.
  4. Swap dark furnishings for lighter ones. Pale, low-thermal-mass flooring such as porcelain or light stone stays cooler than dark tiles or wood, and moving heavy dark rugs and upholstery elsewhere reduces evening radiant heat.
  5. Use plants for partial shade. Tall potted plants near the glazing can take the edge off direct sun and add a little cooling through moisture release, though they will not solve serious overheating on their own.

Pro Tip: Set roof blinds to close automatically by mid-morning in summer rather than waiting until the room already feels hot. Cooling a room after it has heated up takes far longer than preventing the heat in the first place.

Comfort is not just about the thermometer reading. Air temperature, radiant heat off warm surfaces, and glare from bright glazing all combine to make a room feel unbearable, which is why tackling floors and furnishings alongside shading often produces a bigger improvement than either measure alone.

Conservatory furnishings absorbing afternoon heat

Ventilation and low-cost cooling: what actually works

Ventilation only earns its keep once you have already cut the solar gain. Cross-ventilation and roof vents create a chimney effect that pushes hot air out through the roof while drawing cooler air in low down, but that only works well after blinds or film have reduced how much heat is entering to begin with.

  • Open low and high windows together in the early morning and again after sunset, when outside air is cooler than the room.
  • Fit roof vents or automated vents that open on a timer or thermostat, useful if you are often out during the hottest part of the day.
  • Use freestanding or ceiling fans to keep air moving; they cost little to run and help the room feel several degrees cooler than the thermometer suggests.
  • Consider an extractor fan for a quick, targeted way to clear trapped heat, particularly useful if the conservatory has no opening roof vent.

None of this fixes a conservatory baking under direct midday sun with the blinds open. Ventilation moves air around, it does not stop solar gain, so treat it as the second step, not the first.

For more detail on positioning openings correctly, see our guide to improving ventilation in your home this summer.

Is air conditioning worth it for a conservatory?

Air conditioning helps, but only once the room’s heat load has been brought under control first. A unit sized for a normal living room will struggle in a heavily glazed conservatory pulling in strong solar gain, because the unit spends most of its energy fighting incoming heat rather than cooling the air already inside.

Portable units are the cheaper option upfront, but they generally underperform in heavily glazed rooms and run noisier than a properly installed system. A wall-mounted split system costs more to fit but cools more evenly and quietly, and suits a conservatory used daily rather than occasionally.

Where each option fits best:

  • Portable unit: occasional use, smaller conservatories, low upfront budget.
  • Split system: daily use, larger or south-facing rooms, longer-term investment.

The running cost gap between the two widens considerably in a poorly shaded room, since the compressor works harder for longer. Reducing solar gain first lowers the AC capacity you actually need, which cuts both the purchase cost and the electricity bill.

The practical order is always the same: shade and ventilate first, then size an AC unit to what remains, not the other way round.

When is a roof or glazing upgrade actually justified?

If the room is still unusable on warm days after shading, ventilation and mechanical cooling, the glazing itself is probably the limiting factor. That is the point to consider a structural upgrade rather than another quick fix.

Look out for these signs before spending on shading products again:

  • Rooms that stay above comfortable temperature even with blinds closed all day.
  • Condensation in the conservatory roof during cooler months, suggesting poor insulation as well as poor solar control.
  • A polycarbonate or single-glazed roof more than ten to fifteen years old.

Specialist solar-control glass or a hybrid insulated roof can cut heat gain substantially. Some sources report reductions of up to around 70% in favourable cases when high-performance glass replaces older glazing, though actual results depend heavily on orientation and existing roof condition. The trade-off worth understanding: lower U-value glass keeps the room warmer in winter too, so a well-specified upgrade improves comfort year-round, not just in July. Expect the work to take a few days once ordered, and always get at least two written quotes before committing.

How do I choose a reliable conservatory installer?

Getting the right tradesperson matters as much as picking the right product. Work through this before signing anything:

  1. Ask for insurance details and recent references. A reputable installer will provide both without hesitation.
  2. Request product datasheets. These should state U-values and solar control specifications in writing, not just a verbal promise of “cooler glass.”
  3. Ask what temperature improvement to expect. A credible installer gives a realistic range based on your roof’s current condition, not a blanket guarantee.
  4. Confirm warranty length and who handles building regulations. Roof replacements sometimes require sign-off, and the installer should manage this, not leave it to you.
  5. Book a site inspection before agreeing to anything. A proper inspection checks existing U-values, roof pitch, orientation and current glazing condition.

Watch for red flags: no written product data, vague timelines, or pressure to buy an expensive full roof replacement before anyone has actually inspected your conservatory.

Pro Tip: Never accept a quote for a full roof upgrade without an inspection first. A qualified installer can often tell within minutes whether shading and ventilation would solve the problem for a fraction of the cost.

Cloudy2Clear Windows: what we do and why we can help

Established in 2005, Cloudy2Clear Windows has specialised in conservatory and double-glazing repair and replacement ever since. Services relevant to overheating include glass replacement, solar-control glazing upgrades, conservatory roof solutions and full site surveys. An inspection checks your existing glazing’s U-value, roof condition and orientation before recommending anything, so you only pay for the fix your conservatory actually needs.

A practical view on fixing an overheating conservatory

The order matters more than the products themselves: shade first, ventilate second, add mechanical cooling only if the room is still unusable, and treat a roof upgrade as the final step, not the first phone call. Test the cheap fixes for a fortnight before spending on anything structural. If you do decide on glazing work, book it in autumn or winter. Installers are far less stretched outside the summer rush, and you will have the new roof ready well before next year’s heat arrives.

Book a conservatory inspection with Cloudy2Clear Windows

If blinds, ventilation and fans have not solved the problem, the next sensible step is a proper inspection rather than another guess. Cloudy2Clear Windows surveys the existing glazing and roof condition, checks U-values against what the room actually needs, and only then recommends glass replacement, a solar-control upgrade, or a full roof solution, so you are never paying for more than your conservatory requires.

Cloudy2clearwindows


Our teams cover branches including Milton Keynes and Oxford, and homeowners further afield can browse our double glazing glass replacement service for details on what an upgrade typically involves. Get in touch to book a site visit; our team is available Monday to Friday, 8:30am to 6:30pm, to arrange an inspection and a written quote.

Sources

FAQ

How do I stop my conservatory from getting so hot?

Close roof blinds before midday, add solar-control film or external shading, then ventilate during cooler hours. Add fans or correctly sized air conditioning only if the room is still uncomfortable afterwards.

What is the ten-year rule for conservatories?

There is no single universal “ten-year rule” in UK building regulations; conservatories over ten to fifteen years old more commonly have outdated single glazing or polycarbonate roofing, which is why that age range is often flagged as a sensible point to have the glazing inspected.

How do you cool down a glass conservatory quickly?

A fan will make the space feel noticeably cooler even before the air temperature drops.

What is the average lifespan of a uPVC conservatory?

A well-maintained uPVC conservatory frame typically lasts several decades, though the glazing and roofing often need attention or replacement well before the frame itself does, particularly if solar control was never specified originally.

Is it worth upgrading to solar control glass?

If shading, ventilation and mechanical cooling still leave the room unusable on warm days, solar control glass is worth considering.