Getting your window measurements wrong is one of the costliest mistakes you can make before a replacement project. Order a window that’s even a few millimetres too wide or too narrow, and you’re facing return fees, delays, extra call-outs, and potentially a week without a properly sealed opening. This guide takes you through every stage of the measuring process clearly and practically, whether you’re replacing a single sash window at home or updating glazing across a commercial property. Follow these steps and you’ll hand your installer exactly what they need.
What to check before you start measuring
Before you pick up a tape measure, a little preparation goes a long way. Measuring windows for replacement isn’t simply about holding a tape across the glass. There are important decisions and checks to complete first, and skipping them is where many people run into problems.
Measure the structural opening, not the frame
This is the single most important principle to understand before you do anything else. As Windows and Doors Newcastle make clear, you’ll be measuring the brick opening, not the frame itself. This measurement is called the structural opening, sometimes referred to as the rough opening or wall opening. It represents the actual hole in your wall, and it’s what your new window needs to fit inside.

Why does this matter? Old frames can warp, shrink, expand, or have been installed with non-standard fitting margins in the first place. If you measure the old frame, you’ll likely be ordering a window based on incorrect dimensions. The structural opening is your reliable baseline.
Tools you’ll need
Gather everything before you begin so you’re not running back and forth mid-task:
- Steel tape measure (at least 3 metres, lockable)
- Spirit level (to check for plumb and level)
- Notepad and pen or a measuring app on your phone
- Camera or smartphone for photographs
- Step ladder if needed for high or large openings
- Torch for inspecting dark reveals or soffits
Compliance considerations
It’s easy to focus entirely on the physical measurements and overlook the regulatory side. All replacement windows in the UK must comply with UK Building Regulations covering energy performance, ventilation, and safety glazing. As Cherwell Windows confirm, all new and replacement windows must comply with Building Regulations, with FENSA certification typically used to evidence like-for-like replacements. If you’re changing the size, shape, or number of windows, you may need to go further and consult your local authority. This is worth knowing before you commit to any order.
Inspecting the condition of the opening
Walk around each opening you intend to measure and look for:
- Visible damage to the brickwork, lintel, or sill
- Signs of damp or rot around the reveal (the inner edges of the wall)
- Obstructions such as old fixings, external pipework, or render that is crumbling
- Warping or bowing in the existing frame that might disguise the true shape of the opening
If you spot damage, note it clearly. Your installer will need to know, and it could affect the type of window suitable for that opening. You may also want to explore modern window styles if you’re considering a design change at the same time.
Recording from the start
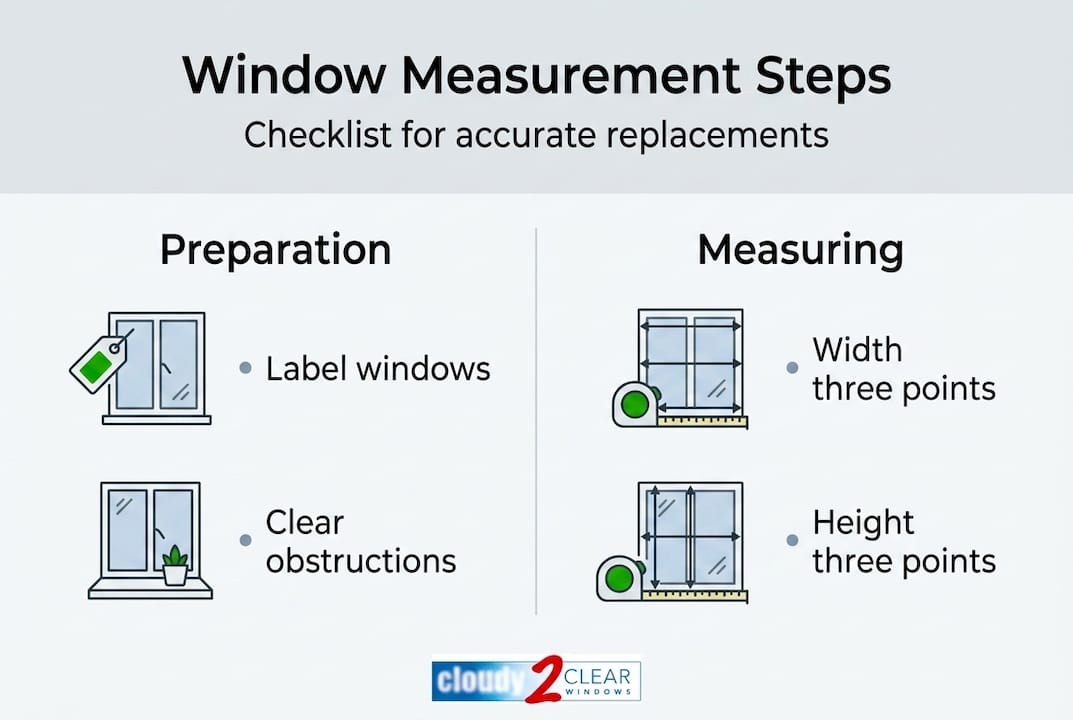
Label each window before you measure it. Use a simple system such as “Lounge Left,” “Bedroom 1 Front,” or “Office Ground Floor North.” Note the labels on your photograph and your written record. Older properties especially can have openings that look visually identical but differ by 15 to 20 millimetres. Don’t rely on memory or assume.
| Preparation task | Why it matters |
|---|---|
| Identify structural opening | Ensures correct sizing for order |
| Gather tools | Avoids mid-task interruptions |
| Check compliance requirements | Avoids failed inspections and rework |
| Inspect condition | Highlights issues before installation |
| Label each window | Prevents mix-ups and ordering errors |
Pro Tip: Take a wide photograph of each opening from inside and outside before you start measuring. This gives your installer valuable context about access, surroundings, and any visual anomalies they should be aware of.
Step-by-step: how to measure your window correctly
Now that you know what to prepare, let’s break down every step to make your measurements precise and installer-ready.
Following a consistent method for every window you measure is the key to accuracy. As Double Glazing Direct’s guide on measuring for casement window replacement explains, the best-practice approach for most standard casement and sash replacements involves measuring width and height at three points each, using the smallest readings, verifying squareness with diagonals, measuring jamb depth, and then applying the fitting-tolerance deduction your supplier or installer specifies.
Here is that process broken down into clear steps:
- Measure the width in three places. Measure across the structural opening from left to right at the top, middle, and bottom. Write down all three figures. Openings are rarely perfectly uniform, particularly in older properties.
- Measure the height in three places. Now measure from top to bottom at the left side, the centre, and the right side. Again, record all three.
- Use the smallest reading for each dimension. Your window must fit inside the narrowest and shortest points of the opening. Using the largest measurement would result in a window that physically cannot fit.
- Check the opening for squareness using diagonal measurements. Place your tape measure from the top-left corner to the bottom-right corner and record the figure. Then measure from the top-right to the bottom-left. If these two diagonal measurements are equal, the opening is square. If they differ, the opening is out of square, which matters for fitting.
- Measure the jamb depth. The jamb (pronounced “jam”) is the thickness of the wall at the window reveal, measured from the inner face to the outer face. Your new window frame must be the right depth to fit correctly in this space without protruding awkwardly or sitting too far back.
- Apply the fitting tolerance deduction. According to Stronghold Security Doors’ 10mm deduction rule, you should deduct a fitting tolerance of commonly around 10 mm from both the width and height. This small gap allows for installation movement, expansion, and proper sealing with foam and mastic around the perimeter. Always confirm the exact deduction with your supplier before placing an order, as this can vary slightly by product and material.
- Record your final figures clearly. Write the adjusted width and height alongside the raw measurements so both you and your installer can see your working.
A well-recorded measurement sheet is worth more than the most expensive measuring tool. If your notes are unclear, no amount of precision earlier in the process will save you.
Pro Tip: Use a installation standards checklist alongside your measurement notes to ensure the window you’re ordering will meet the specification required by your installer or building control officer.
Repeat this process for every single window. Even if you have ten windows of what appears to be the same size, measure every one of them individually. Ordering multiples based on a single measurement is one of the most commonly reported causes of failed window deliveries.
Common mistakes and troubleshooting tips
As you measure, it’s just as important to know what not to do.
Measuring the old frame instead of the structural opening
This is far and away the most frequent error. The old frame may be damaged, may have been installed with a non-standard tolerance, or may have shifted over the years. If you measure it, you’re inheriting its inaccuracies. Always remove the sash or glazing panel if possible and measure the bare structural opening.
Recording errors and mislabelling
Writing down measurements in a rush, transposing digits, or mislabelling which figure belongs to which window are surprisingly common problems. A window ordered with the width and height reversed will obviously not fit. Use a table or dedicated notepad layout and write width before height consistently, every time, for every opening.
Ignoring an out-of-square opening
As ERG Scotland advise, you should measure diagonally from corner to corner in both directions. A significant difference between the two diagonal measurements indicates that the opening is not square. This is not something to fix yourself by adjusting your window order. It’s information your installer needs to know before they arrive, because they may need to pack, trim, or prepare the opening to accept a square window without gaps or distortion.
Common mistakes to avoid:
- Measuring the frame rather than the structural brick opening
- Forgetting to take three measurements per dimension
- Neglecting the diagonal squareness check entirely
- Failing to note the jamb depth, which leads to poorly fitted frames
- Not photographing the opening before and after measuring
- Ordering all windows based on one set of measurements from a “typical” opening
- Overlooking damage or rot that could affect installation
For a fuller picture of what goes wrong with windows in general, you might find our common faults guide useful reading alongside this article.
Troubleshooting non-standard openings
If your opening is unusually wide, taller than standard, or has an arch, consult your supplier or installer before assuming standard methods apply. Bay windows, for example, require careful angle measurements in addition to width and height. Arched openings involve a rise measurement from the chord (straight line across the base of the arch) to the highest point. These situations benefit enormously from a professional pre-survey.
What your installer needs: reporting and handover checklist
With your measurements complete and double-checked, make sure you set your installer up for success.
Your installer cannot do their job efficiently if the information you provide is incomplete or confusing. As Double Glazing Direct’s practical measurement guide points out, even visually identical openings can vary across an older property, so labelling each window and recording width, height, and depth clearly is essential.
Here is how to prepare your handover documentation:
- Compile a window-by-window table with each opening clearly identified by its label, raw measurements, adjusted measurements (after deduction), squareness note, and jamb depth.
- Attach your photographs to each entry where possible, either printed or shared digitally.
- Note any concerns you identified during inspection, including damage, damp, obstructions, or unusual features.
- Confirm compliance awareness by noting whether you’ve checked that the replacement must meet Building Regulations and whether you’ve discussed FENSA certification with your supplier.
- Include any preferences for window frame types or glazing options you’ve already decided on, so your installer can confirm compatibility.
| Information to provide | Why your installer needs it |
|---|---|
| Structural opening width and height (raw) | Baseline for confirming order dimensions |
| Adjusted dimensions (with tolerance deducted) | Confirms ordered size is correct |
| Jamb depth | Ensures correct frame depth is specified |
| Squareness note (diagonal difference if any) | Flags preparation work needed on site |
| Photographs of each opening | Gives visual context before arrival |
| Condition notes (damage, damp, obstructions) | Prevents surprises on installation day |
| Compliance requirements noted | Confirms regulatory awareness |
A clear, complete handover pack like this can prevent multiple unnecessary call-outs and speed up installation day significantly. Installers who arrive with full information can often complete the job in a single visit.
Why DIY measuring is worth doing right the first time
Let’s step back and see why the extra effort up front pays you back long term.
In our experience at Cloudy2Clear Windows, the most expensive part of a window replacement project is rarely the window itself. It’s the wasted time when something goes wrong. A window that doesn’t fit means a return to the supplier, a reorder lead time, a rescheduled installation, and potentially a temporary boarding-up of the opening. That kind of disruption costs money, but it also costs peace of mind.
The homeowners and business owners who get the best results are the ones who treat measuring as a skill worth developing, not just a box to tick. Every property is different. A 1930s semi-detached in Scotland and a 1960s office block in the Midlands will both present unique challenges that no single set of generic instructions can fully anticipate. That’s why this guide emphasises observation, checking, and recording rather than just taking two quick measurements and moving on.
There’s also a real financial reward. Accurate self-measurement means fewer delays, fewer wasted products, and better communication with your installer. The energy savings and value boost that come from a properly fitted replacement window are only fully realised when the installation itself is correct. A poorly fitted window, even with excellent glass, will leak heat and undermine everything you’ve invested in. Getting the measurements right is how you protect that investment from day one.
Good records and clear communication are underrated. An installer who receives a clear, well-labelled measurement pack can focus entirely on doing their best work. That benefits you directly.
Need help or a professional check?
If you’d rather leave measuring and compliance to the experts, here’s how we help.
At Cloudy2Clear Windows, we’ve been helping homeowners and businesses across England and Scotland get their glazing right since 2005. Whether you’re confident in your own measurements and want a second opinion, or you’d prefer a fully managed replacement from survey to installation, we’re here to take the stress away.

Our specialists handle everything from accurate pre-installation surveys to full compliance with UK Building Regulations. If you’re planning a double glazing replacement for your home, or you’re managing a larger project through our commercial fenestration services, our team brings decades of hands-on experience to every job. Reach out today and let us make sure your replacement goes smoothly, first time.
Frequently asked questions
Should I measure the old window frame or the wall opening?
Always measure the structural wall opening, not the old window frame, to ensure a correct fit for your new window.
What does fitting tolerance mean?
Fitting tolerance is a standard deduction, usually around 10 mm, subtracted from both the width and height to allow the window to sit neatly and leave room for sealing.
How do I check if my window opening is square?
Measure both diagonals from corner to corner; if they differ by more than a few millimetres, the opening isn’t square and you should let your installer know before work begins.
Why do building regulations matter for replacement windows?
Replacement windows must meet UK Building Regulations for energy efficiency, ventilation, and safety, with FENSA certification commonly used to demonstrate compliance for like-for-like replacements.
What happens if my measurements are slightly off?
A window that’s too small can stress and buckle the frame during fitting, while one that’s too large leaves gaps requiring excessive sealant, which can reduce thermal performance and lead to long-term seal failure.