• USP Logo Icon
    25 Year Guarantee
  • USP Leaf Icon
    Latest ECO Friendly Technology
  • USP Pointer Icon
    National Coverage
Get a FREE quote

What is patterned glass? types, uses, and benefits

Patterned glass is defined as textured or embossed glass that provides privacy while allowing natural light to pass through, making it one of the most versatile materials in modern architecture. Also known as figured glass, rolled glass, or decorative glass, it is produced in standard thicknesses of 4mm or 6mm, though the full range runs from 3mm to 10mm depending on the application. Cloudy2Clear Windows has worked with patterned and decorative glass across residential and commercial projects since 2005, and the demand for it continues to grow as architects and homeowners seek materials that balance openness with privacy.

What is patterned glass and how is it made?

Patterned glass is manufactured through a continuous rolling process. Molten glass is fed between two rollers, at least one of which carries an engraved pattern. The pattern transfers directly onto the glass surface as it cools, producing a consistent texture across the entire sheet. Some products are embossed on both sides for a more pronounced effect.

Close-up of rollers embossing patterned glass


The manufacturing method determines the depth and character of the texture. Shallow textures produce subtle privacy with high light transmission. Deeper textures create stronger obscurity but reduce the amount of light that passes through. Understanding this relationship is the starting point for any good glass specification.

Common patterned glass types

The range of available designs is broader than most people expect. Current categories include:

  • Linear patterns such as Reeded and Ribbed, which use parallel vertical or horizontal grooves to create a clean, directional effect
  • Organic patterns such as Rain and Floral, which scatter light more randomly and suit traditional or natural interiors
  • Geometric patterns including diamond and square textures, which work well in contemporary commercial settings
  • Minimalist textures such as Micro Ribbed and Satin, which offer subtle privacy with a near-clear appearance

Modern design trends favour minimalistic patterns like Reeded and Micro Ribbed over traditional busy styles. This shift reflects a broader architectural preference for clean, quiet privacy solutions that do not compete visually with the rest of a space.

Pro Tip: Match pattern depth to your light requirements. A shallow texture like Satin transmits more light and suits rooms where brightness matters. A deeper texture like Floral suits spaces where stronger privacy is the priority.

Infographic showing benefits of patterned glass

What are the performance characteristics and benefits of patterned glass?

Patterned glass does far more than look good. Its technical performance is what makes it a serious specification choice for architects and designers.

Light transmission and solar performance

Visible light transmission through patterned glass ranges from 50% to 90%, while solar energy transmission sits between 40% and 80%. Both figures depend on texture depth and glass clarity. A shallow, near-clear texture sits at the higher end of both ranges, while a deeply embossed pattern sits at the lower end.

Privacy and obscurity levels

Patterned glass is rated on an obscurity scale from 1 to 5. Level 1 offers minimal obscurity, allowing shapes and movement to be seen clearly. Level 5 is fully obscuring, with no recognisable shapes visible through the glass. This scale gives you a practical tool for matching glass to spatial needs, rather than guessing from a sample.

Obscurity level Privacy effect Typical application
1 Low, shapes visible Decorative partitions, feature doors
2 Mild, outlines softened Internal screens, retail displays
3 Moderate, shapes blurred Office partitions, bathroom windows
4 High, silhouettes only Shower enclosures, medical facilities
5 Full, no shapes visible Maximum privacy glazing

Maintenance and hygiene

Patterned glass texture masks water spots, fingerprints, and dust far better than clear glass. This makes it a practical choice for high-use areas such as shower enclosures, office partitions, and public-facing retail screens. The surface does not show soiling as readily, which reduces the frequency of cleaning without compromising appearance.

Safety and building compliance

Patterned glass often requires tempering or lamination to meet building safety codes, particularly in hazardous locations such as shower enclosures or low-level glazing. Tempered patterned glass breaks into small, blunt fragments rather than sharp shards. Laminated versions hold together on impact. Both treatments are available across most pattern types. For guidance on which treatment suits your project, the types of safety glass guide covers the key distinctions clearly.

Pro Tip: Specify low-iron patterned glass for high-end projects. Standard glass contains iron oxide, which gives edges and deeper textures a greenish tint. Low-iron glass eliminates this, producing truer colours and a cleaner appearance.

What are the common uses of patterned glass in architecture and design?

Patterned glass appears across a wide range of settings, from domestic bathrooms to large commercial interiors. Its ability to combine privacy with daylight makes it useful wherever you need to divide or screen a space without blocking light entirely.

Typical applications include:

  • Shower enclosures and bathroom windows, where privacy is non-negotiable but natural light remains desirable
  • Office partitions and conference rooms, where visual separation supports focus without creating a closed, oppressive environment
  • Healthcare interiors, where patterned glass enables zoning and privacy without blocking daylight, improving occupant comfort
  • Retail and hospitality environments, where decorative glass adds character while managing sightlines
  • Internal doors and furniture, where glass panels add lightness to solid structures
  • Facade elements, where textured glass creates visual interest on building exteriors

The use of frosted glass in residential applications increased by 15% in 2025. That figure reflects a wider trend: homeowners are choosing decorative glass options not just for bathrooms but for room dividers, kitchen splashbacks, and entrance doors. The material has moved well beyond its traditional role.

Patterned glass also performs well in commercial glazing applications where energy efficiency and natural light management matter. In open-plan offices, ribbed or reeded glass partitions allow daylight to travel deeper into the floor plate while still giving individual workspaces a degree of visual separation.

How to choose patterned glass: key considerations

Selecting the right patterned glass requires you to balance privacy needs, aesthetic goals, and technical requirements. Working through these points in order makes the decision straightforward.

  1. Define your privacy requirement. Use the obscurity scale (1 to 5) as your starting point. A bathroom window needs at least a level 3. A shower enclosure typically needs a level 4 or 5.
  2. Choose a pattern style that suits the space. Linear patterns like Reeded suit contemporary interiors. Organic patterns like Rain suit traditional or period properties. Geometric textures work well in commercial settings.
  3. Select the right thickness. Most residential applications use 4mm or 6mm glass. Thicker options up to 10mm suit structural or high-traffic applications. Thinner glass at 3mm is limited to low-load decorative uses.
  4. Specify the correct safety treatment. Shower enclosures, low-level glazing, and doors require tempered or laminated glass to meet building regulations. Tempered patterned glass is the standard choice for most hazardous locations.
  5. Consider glass clarity. Standard glass works well for most applications. Low-iron glass is worth specifying where colour accuracy matters, such as in high-end residential projects or premium commercial interiors.
  6. Check compatibility with insulated glass units. Patterned glass can be incorporated into double-glazed units for energy efficiency. The texture faces inward in most configurations to protect the embossed surface. Cloudy2Clear Windows can advise on the correct configuration for your specific installation.

Pro Tip: Always check your local building regulations before specifying patterned glass for structural or safety-critical locations. Cloudy2Clear Windows specialists can confirm compliance requirements and recommend the right product for your project.

Why patterned glass deserves more credit than it gets

After nearly two decades of working with glazing across homes and commercial buildings, I have noticed that patterned glass is consistently underestimated. Most people think of it as a bathroom material. The reality is that it is one of the most technically capable and design-flexible glazing options available.

The shift towards minimalist textures like Reeded and Micro Ribbed is significant. These patterns give architects a tool for creating privacy without visual noise. A Reeded glass partition in an open-plan office does not shout for attention. It simply does its job quietly, letting light through while giving people a sense of separation.

What I find most interesting is the untapped potential in sustainable design. Patterned glass in insulated units can manage solar gain, reduce glare, and support natural daylighting strategies, all without sacrificing privacy. That combination is genuinely useful in a world where energy performance and occupant wellbeing are both priorities.

My advice: treat patterned glass as a technical specification decision first and a decorative choice second. The aesthetics will follow naturally once you have matched the obscurity level, thickness, and safety treatment to the space.

Patterned and decorative glass services from Cloudy2Clear Windows

Cloudy2Clear Windows has been installing and repairing double-glazed windows across residential and commercial properties since 2005. That experience extends to patterned and decorative glass across a wide range of applications, from bathroom windows to office partitions and facade elements.

https://www.cloudy2clearwindows.co.uk


Whether you need a double glazing replacement with a specific patterned glass type, or professional advice on obscurity levels and safety treatments, the Cloudy2Clear Windows team is ready to help. Local branches across the UK offer repair and installation services tailored to your property. Readers in the Milton Keynes area can contact the Milton Keynes branch directly for a consultation. Get in touch today and let the team help you find the right glass for your space.

FAQ

What is patterned glass used for?

Patterned glass is used in shower enclosures, bathroom windows, office partitions, internal doors, and facade elements. Its primary function is to provide privacy while allowing natural light to pass through.

How does patterned glass differ from clear glass?

Patterned glass has a textured or embossed surface that scatters light and obscures visibility. Clear glass transmits light without distortion and offers no privacy.

What obscurity level do I need for a shower enclosure?

A shower enclosure typically requires an obscurity level of 4 or 5 on the standard scale of 1 to 5. Level 5 provides full obscurity with no recognisable shapes visible through the glass.

Does patterned glass need to be toughened?

Patterned glass in hazardous locations such as shower enclosures, low-level glazing, and doors must be tempered or laminated to comply with building safety regulations. Standard untreated patterned glass is not suitable for these applications.

What thickness of patterned glass should I choose?

Most residential applications use 4mm or 6mm patterned glass. Thicker options up to 10mm suit structural or high-traffic settings, while 3mm is limited to low-load decorative uses.

How to winterproof windows: a UK homeowner’s guide

Windows are the single biggest source of heat loss in most UK homes, accounting for 25–30% of total heating energy use. That figure means a poorly sealed window is costing you money every day the heating runs. Knowing how to winterproof windows properly, using a combination of air sealing, insulation film, and thermal curtains, gives you a practical way to cut those losses without a major renovation. The good news is that basic DIY winterisation typically costs under £40 per window and takes 30–60 minutes to complete.

What tools and materials do you need to winterproof windows?

Gathering the right supplies before you start saves time and prevents half-finished jobs. The core tools are a putty knife, a caulking gun, scissors, and a blow dryer. You will also need cleaning cloths, rubbing alcohol, and a bucket of warm soapy water to prepare surfaces properly.

The materials you choose depend on which part of the window you are treating. Here is a quick breakdown:

  • Exterior-grade caulk: seals fixed, stationary joints around the window frame permanently
  • Removable rope caulk: fills gaps temporarily and peels away cleanly in spring
  • Foam weatherstrip tape: fits around movable sashes and casements to block drafts
  • Shrink-film insulation kits: create a secondary air barrier across the entire pane
  • Thermal or cellular curtains: add a layer of insulation against cold glass
  • Draft stoppers: sit along the windowsill to block low-level cold air
Material Approx. cost Durability Ease of application
Foam weatherstrip tape £3–£8 per roll 1–3 seasons Very easy
Removable rope caulk £4–£7 per roll 1 season Easy
Exterior-grade caulk £5–£10 per tube 5–10 years Moderate
Shrink-film kit £8–£15 per pack 1 season Easy with blow dryer
Thermal curtains £20–£60 per pair Several years Very easy


Pro Tip: Clean every surface with rubbing alcohol before applying double-sided tape or film kits. Grease and dust cause adhesives to fail within days, wasting both materials and effort.

How to identify and seal window leaks properly

Hands checking window drafts with incense stick


Sealing is the most effective single step you can take to reduce heat loss through windows. Air infiltration and thermal conduction are two separate problems, and sealing tackles the first one directly.

Finding drafts

Hold a lit candle or incense stick close to the window frame on a cold, windy day. A flickering flame or drifting smoke reveals exactly where cold air is entering. Work around the entire frame, including the corners and the meeting rail where two sashes overlap.

Infographic outlining winterproofing steps

Sealing step by step

Follow this sequence for the best result:

  1. Clean the surface. Wipe the frame and sill with warm soapy water, then dry thoroughly. Finish with a wipe of rubbing alcohol on any area where adhesive will be applied.
  2. Apply exterior-grade caulk to fixed joints. Run a steady bead along the join between the window frame and the wall. Smooth it with a damp finger and leave it to cure fully before painting over it.
  3. Apply removable rope caulk to gaps in the frame. Press it into cracks with your finger. It stays flexible in cold weather and peels away without damage when spring arrives.
  4. Fit foam weatherstrip tape to movable sashes. Cut the tape to length, peel the backing, and press it firmly into the channel where the sash meets the frame. Close the window to compress the seal.
  5. Lock the window. Locking after fitting weatherstrip compresses the seal tighter, creating a firmer barrier against drafts.
  6. Recheck with the candle test. Run the flame around the frame again to confirm all leaks are closed.

The most common mistake here is applying permanent caulk to a movable sash. Doing so seals the window shut and can block emergency egress. Always use removable rope caulk or foam tape on any part of the window that opens.

Pro Tip: Use clear, removable weatherstrip caulk on movable parts rather than standard silicone. It stays flexible, does not yellow, and comes away cleanly without leaving residue on the frame.

What insulation options add thermal protection to windows?

Sealing stops air movement, but cold still conducts through the glass itself. Combining sealing with insulation addresses both heat loss modes and produces noticeably warmer rooms. The following methods are the most practical for UK homeowners and tenants.

Window insulation film kits

Shrink-film kits attach a clear plastic sheet across the interior of the window frame using double-sided tape. You then apply heat from a blow dryer to shrink the film taut and remove wrinkles. The result is a secondary glazing effect that traps a layer of still air between the film and the glass.

The main advantage is cost: a kit covering two standard windows typically costs under £15. The drawback is that the film reduces ventilation entirely, so you should not apply it to windows you need to open regularly during winter.

Thermal and cellular curtains

Thermal curtains use a dense, layered fabric to slow heat transfer through the glass. Cellular or honeycomb curtains trap air in small pockets within the fabric, which adds extra insulation value. For best results, hang curtains as close to the glass as possible and let them reach the floor or windowsill. Open them fully during daylight hours to allow solar gain, then close them at dusk to retain warmth.

You can find more detail on improving window insulation in our dedicated guide for UK homeowners.

Draft stoppers and bubble wrap

Draft stoppers placed along the windowsill block cold air that pools at floor level. They are inexpensive, reusable, and require no tools.

Bubble wrap is sometimes suggested as a free insulation layer, but it carries a real risk. Bubble wrap traps moisture against the glass and frame, which can cause mould on timber frames and condensation damage. Restrict its use to basement or utility windows where appearance and moisture risk are lower.

How to maintain winterproofing measures throughout the cold season

Applying seals and insulation in autumn is only half the job. Maintenance keeps those measures working through the coldest months.

Key checks to carry out regularly:

  • Inspect seals every few weeks. Adhesive foam and weatherstrip tape can become brittle after sharp temperature swings. Seals that shrink or lift need replacing promptly to prevent heat loss returning.
  • Recheck after severe weather. High winds and driving rain stress adhesive bonds. Run the candle test again after any storm to catch new gaps.
  • Keep windows locked. A locked window compresses the weatherstrip continuously, maintaining the seal without any extra effort.
  • Remove winterproofing safely in spring. Peel rope caulk and film kits away slowly and at room temperature. Pulling too fast or in cold conditions can lift paint from timber frames.
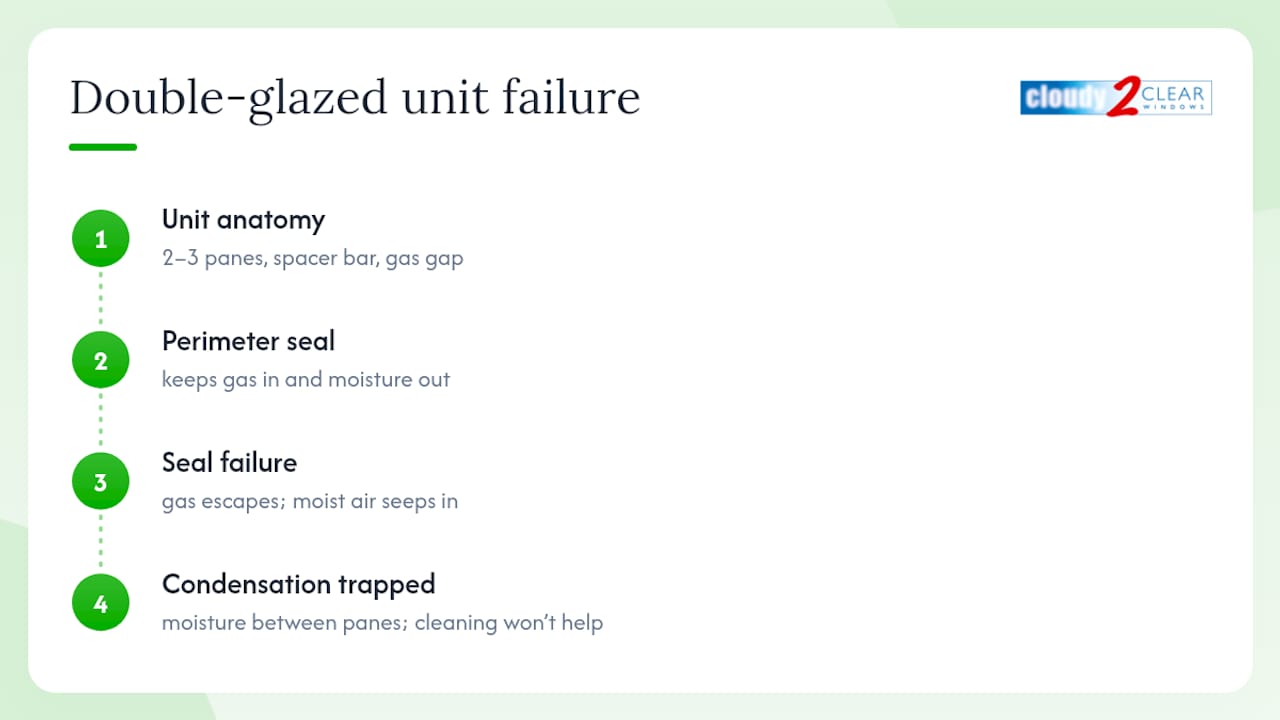
  • Check for condensation between panes. Misting inside double glazing indicates a failed seal in the unit itself, which no amount of DIY weatherstripping will fix.

For a full routine on maintaining window seals effectively, our detailed guide covers what to look for and when to act.

What common mistakes should you avoid when winterproofing windows?

Even well-intentioned efforts can go wrong. These are the errors that reduce effectiveness or cause damage:

  • Applying permanent caulk to movable sashes. This locks the window shut and can prevent emergency exit. Use removable products on any part that opens.
  • Skipping surface preparation. Adhesives applied to dusty or greasy frames fail quickly. Always clean and dry surfaces before applying any tape, caulk, or film.
  • Starting too late in the season. The best time to winterproof is early autumn when temperatures remain mild. Caulk and adhesive strips applied in freezing conditions bond poorly and may peel within weeks.
  • Ignoring maintenance checks. Fitting weatherstrip in october and never checking it again means you may be heating through gaps from november onwards without realising it.
  • Using bubble wrap on visible windows. Beyond the moisture risk, it blocks light and looks unsightly. Reserve it for out-of-sight utility glazing only.
  • Sealing without checking for existing damage. Applying tape over a cracked frame or broken seal in the glazing unit wastes effort. Fix underlying problems first.

Pro Tip: Set a reminder on your phone for the first week of september each year. That gives you time to buy materials, apply them in mild weather, and still have weeks of autumn left to check the results before the cold sets in.

What we have learned from years of window winterproofing advice

After nearly two decades working with homeowners and tenants across the UK, the pattern is clear: the people who get the best results combine methods rather than relying on one fix. Weatherstripping alone reduces drafts but does nothing for the cold radiating off the glass. Film kits alone help with conduction but leave gaps around the frame untouched. The combination of sealing and insulation is what actually makes a room feel warmer.

The other thing I would stress is timing. Homeowners who wait until the first frost are already fighting the problem. Applying adhesives in cold weather is genuinely harder, and the bonds are weaker. A calm afternoon in september or early october, when you can open the window to clean the frame and still have the heating off, is the ideal moment.

Finally, DIY measures have real limits. If your double glazing has misted up between the panes, or the frame has visible rot or cracks, no amount of film or tape will compensate. That is the point where professional repair adds lasting value rather than just seasonal comfort.

— Cloudy2Clear Windows

How Cloudy2Clear Windows can help beyond DIY

DIY winterproofing handles drafts and surface insulation well. When the problem runs deeper, such as failed double glazing units, damaged frames, or persistent condensation, professional repair is the more reliable solution.

https://www.cloudy2clearwindows.co.uk


Cloudy2Clear Windows has been repairing and replacing double glazed windows across the UK since 2005. Local teams cover areas including Milton Keynes, Oxford, and Leicester, with the expertise to restore your glazing to full efficiency. A repaired window retains heat far better than one held together with weatherstrip tape, and the improvement lasts for years rather than one season.

FAQ

How much heat do windows lose in a typical home?

Windows account for 25–30% of residential heat loss. Sealing and insulating them is one of the most cost-effective ways to reduce heating bills.

When is the best time to seal windows for winter?

Early autumn is the best time. Applying caulk or adhesive strips in freezing temperatures causes poor adhesion, so aim to complete the work before the first cold snap.

Can I winterproof windows as a tenant without causing damage?

Yes. Temporary products such as removable rope caulk, foam weatherstrip tape, and shrink-film kits leave no damage to frames and peel away cleanly in spring.

Do I need to combine sealing and insulation methods?

Combining both methods produces the best result. Caulk and weatherstripping stop air infiltration, while film kits and thermal curtains reduce heat conducting through the glass itself.

How do I know if my double glazing needs professional repair?

Misting or condensation between the panes indicates a failed glazing seal that DIY products cannot fix. A professional repair restores the insulating gas layer and eliminates the problem at its source.

Timber vs uPVC windows: which is right for your home?

Timber and uPVC windows are the two dominant frame materials in the UK residential market, and the difference between wood and uPVC frames goes far deeper than appearance alone. Timber frames offer superior thermal performance, a lifespan of 60 years or more, and a natural aesthetic that uPVC cannot replicate. uPVC frames cost less upfront, typically £550–£800 per frame supplied and fitted, and require almost no maintenance. The right choice depends on your budget, your property type, and how long you plan to stay. This guide covers costs, energy efficiency, maintenance, and property value so you can decide with confidence.

What are the upfront costs and expected lifespans of timber vs uPVC windows?

Price is usually the first thing homeowners look at, and the gap is real. As of 2026, uPVC frames cost £550–£800 per frame supplied and fitted, while timber frames command £850–£1,400 per frame. That is an initial difference of roughly £450–£700 per opening.

The lifespan figures change the calculation significantly. Modern uPVC windows last 20–25 years under typical UK conditions. Well-maintained engineered timber windows can last 60 years or longer, with some manufacturers offering warranties of up to 50 years. Over a 60-year period, you may replace a uPVC installation two or three times before a timber frame needs replacing at all.

Feature uPVC Timber
Supplied and fitted cost £550–£800 per frame £850–£1,400 per frame
Typical lifespan 20–25 years 60+ years
Warranty period 10 years (typical) Up to 50 years
Replacement cycles (60 years) 2–3 replacements 1 installation


Infographic comparing timber and uPVC window features


Over a 25-year period, timber windows often cost similar to or less than repeatedly replacing uPVC frames. That makes timber the more economical choice for homeowners who plan to stay in their property for 15 years or more.

Pro Tip: If you are buying a property you intend to keep long term, calculate the total cost over 40–60 years rather than the purchase price alone. Timber’s lower replacement frequency frequently makes it cheaper in the long run.

How do timber and uPVC windows compare on energy efficiency?

Thermal performance is where timber genuinely surprises people. The U-value measures how much heat a window loses: the lower the number, the better the insulation. Modern double-glazed timber casements achieve U-values of 1.4 W/m²K, and triple-glazed timber units can reach below 1.0 W/m²K. That outperforms many standard uPVC frames.

Technician testing timber window energy efficiency indoors


The reason lies in the material itself. Timber has inherently low thermal conductivity, which means the frame itself acts as an insulator. uPVC requires additional thermal breaks built into the profile to achieve comparable performance. Those breaks add cost and complexity to the manufacturing process.

Key energy efficiency facts for UK homeowners:

  • Double-glazed timber frames achieve U-values of 1.4 W/m²K as standard.
  • Triple-glazed timber units reach below 1.0 W/m²K, meeting Passivhaus-adjacent standards.
  • uPVC frames with thermal breaks can match timber double-glazing but rarely exceed it without upgrading to premium profiles.
  • Upgrading either frame type to triple glazing delivers the most significant reduction in heating bills.
  • You can read more about sustainable window performance and how U-values affect running costs on the Cloudy2Clear Windows resource pages.

The environmental picture matters too. Timber windows sequester carbon during their service life, locking roughly 50 kg of CO₂ equivalent per frame. uPVC has higher embodied carbon and presents recycling challenges at end of life. For homeowners prioritising eco-friendly window materials, timber is the clearer choice.

What are the maintenance requirements for timber versus uPVC?

Maintenance is the area where uPVC wins most clearly. uPVC requires only occasional cleaning with mild soap and water. There is no painting, no sealing, and no specialist treatment needed across its entire service life.

Timber asks more of you. Here is what a realistic maintenance schedule looks like:

  1. Every 1–2 years: Clean frames with a mild detergent and inspect for any cracks, peeling paint, or signs of moisture ingress.
  2. Every 8–12 years: Repaint or reseal the frames fully. This is the single most important task for preserving timber longevity.
  3. As needed: Sand back any localised damage, apply a wood preservative, and refinish. Timber frames can be repaired, sanded, or refinished rather than replaced entirely.
  4. After severe weather: Check seals and glazing beads for any movement or gaps, particularly after a harsh winter.
  5. Annually: Lubricate hinges and locking mechanisms to prevent stiffness and wear.

The repairability point is significant. If a uPVC frame cracks or warps badly, the entire unit must be replaced. A damaged timber frame can often be restored by a skilled joiner at a fraction of the replacement cost. That repairability is one of the strongest timber window advantages for older properties.

Pro Tip: Book your timber window repainting in late spring or early summer. Dry, warm conditions allow paint and sealant to cure properly, giving you the best protection before autumn rain arrives. You can find practical guidance on maintaining double-glazed windows on the Cloudy2Clear Windows website.

How do timber and uPVC windows affect property value and aesthetics?

Aesthetics and property value are closely linked, and timber holds a clear advantage in both areas for many UK properties. Estate agents report that installing timber windows can increase property values by 5–10%, particularly in heritage or conservation areas. That uplift reflects the perceived quality and kerb appeal that timber delivers.

uPVC has improved considerably in recent years. Manufacturers now offer woodgrain foils, anthracite grey finishes, and slim sightlines that mimic traditional frames. However, the imitation has limits. Planning authorities and conservation officers can usually distinguish between authentic timber and a uPVC substitute, and that distinction matters legally.

Key considerations for property value and planning:

  • Conservation area regulations often mandate timber windows, as uPVC cannot replicate authentic finishes or sightlines to the standard required by local planning authorities.
  • Listed buildings almost always require timber frames. Installing uPVC without consent can result in enforcement action and a requirement to reinstate original materials at your own cost.
  • For new builds and modern properties, uPVC is widely accepted and often preferred by developers for its cost efficiency and low maintenance burden.
  • Timber’s aesthetic flexibility means frames can be repainted to match changing interior or exterior colour schemes, making them genuinely future-proof.

“Timber windows are not just a style choice. In conservation areas and listed buildings, they are frequently the only compliant option.” For guidance on heritage properties specifically, the Cloudy2Clear Windows article on heritage glazing compliance is worth reading before you commit to any frame type.

For property developers, the calculus is different. On a new build or a buy-to-let, uPVC reduces upfront spend and ongoing maintenance liability. On a period conversion or a property in a conservation area, timber protects planning compliance and supports a higher sale price.

What Cloudy2Clear Windows has learned from 20 years of window installations

After two decades of installing, repairing, and replacing windows across the UK, the pattern is consistent. Homeowners who choose uPVC for the right reasons, primarily low maintenance and tight budgets, are generally satisfied. Those who choose uPVC simply because it is cheaper, without considering their property type or long-term plans, often come back to us when the frames discolour, warp, or need full replacement after 20 years.

The maintenance reality of timber is also frequently overstated. Repainting every 8–12 years is not a significant burden when you consider that the alternative is a full frame replacement. Most homeowners who commit to that schedule find their timber windows look better at 30 years than a uPVC installation does at 15.

For property developers, I would say this plainly: specify timber on any period property or conservation area project. The planning risk of uPVC is real, and the value uplift from timber is consistent. On modern builds, uPVC remains a sensible specification, particularly for buy-to-let where tenant turnover means maintenance needs to be minimal.

The one area where I see homeowners genuinely struggle is the upfront cost of timber. It is a real barrier. But if you are planning to stay in your home for more than 15 years, the lifecycle cost comparison almost always favours timber. The frame you install today could outlast two or three uPVC replacements.

— Cloudy2Clear Windows

Cloudy2Clear Windows: expert help for timber and uPVC installations

Choosing between frame materials is only the first decision. Getting the installation right matters just as much.

https://www.cloudy2clearwindows.co.uk


Cloudy2Clear Windows has been installing and repairing double-glazed windows across the UK since 2005, working with both timber and uPVC frames in residential and commercial properties. Whether you need a double glazing repair in Oxford, a replacement in Leicester or Loughborough, or advice on the right frame for a conservation area property, our local branches carry the expertise to help. We also cover Milton Keynes, Watford, and many other areas across England. Contact your nearest branch for a no-obligation assessment.

FAQ

Which is cheaper long term: timber or uPVC windows?

Timber windows are typically cheaper over a 40–60 year period because they rarely need full replacement. uPVC frames last 20–25 years, meaning most homeowners face two or three replacement cycles in the same timeframe.

Can uPVC windows be used in conservation areas?

Conservation area regulations frequently prohibit uPVC windows because they cannot replicate the authentic sightlines and finishes of traditional timber frames. Always check with your local planning authority before specifying frame materials on a heritage or listed property.

What U-value do timber windows achieve?

Modern double-glazed timber casements achieve U-values of 1.4 W/m²K. Triple-glazed timber units can reach below 1.0 W/m²K, which outperforms many standard uPVC profiles.

How often do timber windows need repainting?

Timber windows need repainting or resealing every 8–12 years under typical UK conditions. Annual cleaning and hardware lubrication are also recommended to maintain performance and appearance.

Do timber windows add value to a property?

Estate agents report that timber windows can increase property values by 5–10%, particularly in heritage or conservation areas where kerb appeal and planning compliance carry a premium.

Window cleaning checklist: your complete 2026 guide

A window cleaning checklist is a structured set of steps, tools, and timing guidelines that ensures every window in your home or business is cleaned thoroughly and without streaks. Most homeowners clean their windows without a system, which is why smears, missed corners, and rapid re-soiling are so common. A proper checklist, built around a quality squeegee, microfiber towels, and the right cleaning solution, removes that guesswork entirely. Cloudy2Clear Windows has worked with both residential and commercial properties since 2005, and the difference a structured approach makes is clear every time.

1. Which tools are essential for your window cleaning checklist?

Close-up of hands using squeegee on window


The right tools determine whether you get a streak-free finish or spend twice as long buffing out smears. Cutting corners on equipment is the single most common reason DIY window cleaning fails.

The core toolkit:

  • Squeegee: A good quality squeegee with a rubber blade is the most important tool you own. Choose one with a replaceable blade and a handle suited to your window size. A 30 cm blade works well for standard residential windows.
  • Microfiber cloths: Microfiber outperforms every alternative for glass cleaning. It lifts dirt without scratching and leaves no lint behind. Keep at least four cloths per session so you always have a dry one ready.
  • Cleaning solution: The professional standard is simple. One nickel-sized drop of dish soap per gallon of hot water delivers effective cleaning with minimal residue. Avoid multi-surface sprays with wax additives.
  • Scrubber or applicator sleeve: A scrubber pad or sleeve fits over a T-bar handle and applies solution evenly across the glass. It loosens stubborn grime before the squeegee passes.
  • Two buckets: Use one for your cleaning solution and one for rinsing your scrubber. This stops dirty water going back onto the glass.
  • Soft brush or vacuum attachment: Use these to clear dust and debris from frames and sills before any wet cleaning begins.
  • Cotton swabs: Useful for reaching tight corners in window tracks where a cloth cannot fit.

Pro Tip: Never use paper towels or newspaper on glass. Paper towels create static that attracts dust, meaning your windows look dirty again within days.

2. What step-by-step process does a thorough glass cleaning guide follow?

Sequence matters as much as technique. Cleaning glass before frames pushes dirt back onto clean surfaces and forces you to start again.

  1. Dust frames and sills dry. Use a soft brush or vacuum attachment to remove loose dust and debris from frames, sills, and tracks before any water touches them. Moisture turns dust into mud, which streaks the glass and clogs your squeegee.
  2. Clean window tracks. Vacuum tracks first, then wipe with a damp cloth. Use cotton swabs for the corners. Do this before washing the glass so debris does not fall onto wet surfaces.
  3. Mix your solution. One nickel-sized drop of dish soap per gallon of hot water is the correct ratio. Too much soap leaves a film that causes streaks.
  4. Apply solution to the glass. Use your scrubber or applicator sleeve to coat the entire pane. Work from top to bottom and cover every centimetre, paying attention to the edges where grime builds up.
  5. Squeegee from top to bottom. Start at the top and use an S-shaped motion, overlapping each pass slightly. Keep the blade at a consistent angle against the glass.
  6. Wipe the blade after every pass. Wiping the squeegee blade dry after each stroke stops grime being redeposited on clean glass. This step is what separates a professional finish from an amateur one.
  7. Detail the edges. Use a dry microfiber cloth to wipe any remaining solution from the edges and corners of the pane.
  8. Clean screens separately. Remove screens, rinse with a hose or in a bath, and allow them to dry fully before replacing.
  9. Choose the right weather. Overcast, still days slow evaporation and reduce streaking. Avoid cleaning in direct sunlight, as the solution dries on the glass before you can squeegee it off.

Pro Tip: Plan your cleaning to stay ahead of or behind the sun as it moves around your property. Cool glass surfaces are far easier to clean without streaks.

3. How often should windows be cleaned and maintained?

Frequency depends on your location and the type of property you manage. A single schedule does not suit every building.

  • Twice per year as a baseline. Most residential properties benefit from a thorough clean in spring and again in autumn. Spring removes winter grime; autumn prepares glass for low winter light.
  • Up to four times per year in urban or coastal areas. Properties near busy roads, industrial zones, or the sea accumulate pollution, salt, and debris far faster. Two to four cleanings annually are recommended based on environmental exposure.
  • A 30-minute maintenance session as needed. When you notice visible dust or smudges between deep cleans, a focused session is all it takes. A 30-minute routine cleans 4–8 standard windows when your tools are prepared in advance.
  • Seasonal checks for frames and seals. Use each cleaning session to inspect frames, seals, and sills for signs of damage, damp, or deterioration. Catching problems early prevents costly repairs later.

For double glazing specifically, the double glazing cleaning steps differ slightly from standard single-pane glass, particularly around the seal edges.

4. What common mistakes does the window washing checklist help you avoid?

Most cleaning errors come down to skipping steps or using the wrong materials. A checklist removes both problems.

  • Cleaning in direct sunlight. Solution evaporates before you can squeegee it off, leaving a film of dried soap on the glass. Always clean on overcast days or in the shade.
  • Skipping the dry dust stage. Wet cleaning frames and sills before dusting turns loose debris into mud. That mud then smears across the glass and is far harder to remove.
  • Using paper towels or newspaper. Both materials create static electricity on the glass surface. That static attracts airborne dust, so windows appear dirty again within a short time.
  • Not wiping the squeegee blade. Every pass deposits a small amount of grime onto the blade. If you do not wipe it clean, the next pass redistributes that grime across the glass.
  • Washing microfiber cloths with fabric softener. Fabric softener coats microfiber fibres and reduces their absorbency. The result is a cloth that smears rather than lifts moisture, leaving streaks on every pane.

A checklist does not just tell you what to do. It tells you what order to do it in, and that sequence is what makes the difference between a streaky finish and a spotless one.

5. How to tailor the checklist for residential versus commercial properties

The core steps remain the same, but the scale, tools, and safety requirements change significantly between a home and a commercial building.

Factor Residential Commercial
Window types Standard double glazing, casement, sash Large glass panels, curtain walling, shopfronts
Cleaning frequency 2 times per year minimum Up to 4 times per year, often monthly for retail
Tools required Squeegee, microfiber, bucket Water-fed poles, professional squeegees, scaffolding or platforms
Additional surfaces Sills, frames, screens Gutters, downpipes, cladding, signage surrounds
Safety considerations Ground level or low ladders Working at height regulations, risk assessments required
Double glazing care Standard seal inspection Specialist inspection for large units and curtain walling


Commercial property managers should build exterior window maintenance into a scheduled programme rather than treating it as a reactive task. Cloudy2Clear Windows provides commercial window maintenance strategies that cover both cleaning routines and structural checks. For UK managers specifically, commercial property window guidance addresses scheduling, compliance, and contractor selection.

Residential homeowners dealing with double glazing should pay particular attention to the seal between panes. A clean exterior does not compensate for internal condensation caused by a failed seal. If you notice misting between the panes, that is a repair issue, not a cleaning one.

What Cloudy2Clear Windows has learned from two decades of window care

The most consistent mistake I see, whether in a terraced house or a large commercial building, is treating window cleaning as a single task rather than a sequence. People grab a cloth, spray something on the glass, and wipe. Then they wonder why there are streaks.

The preparation stage is where most of the result is decided. Dry dusting frames and sills before any water appears takes two minutes and prevents the majority of streaking problems. Weather awareness is equally underestimated. I have seen perfectly good technique produce poor results simply because someone cleaned in full afternoon sun on a warm day.

Tool maintenance matters more than most people realise. A squeegee blade that has been stored incorrectly or used past its lifespan will drag and skip across the glass. Replace blades regularly and store them flat or hanging, never resting on the rubber edge.

My preferred cleaning mixture remains the professional standard: one small drop of dish soap in a full gallon of hot water. Nothing more. Stronger solutions leave residue; weaker ones do not cut through grime. The ratio matters.

Finally, a checklist works because it removes decision fatigue. When you follow the same sequence every time, you stop forgetting steps. That consistency is what produces reliable, repeatable results across every window on your property.

— Cloudy2Clear Windows

How Cloudy2Clear Windows supports your window maintenance

Regular cleaning keeps glass looking its best, but it cannot fix underlying problems with seals, frames, or glazing units.

https://www.cloudy2clearwindows.co.uk


Cloudy2Clear Windows has been repairing and replacing double glazed windows across the UK since 2005. If your cleaning routine reveals misted panes, damaged seals, or cracked glass, our team can help. We offer double glazing replacement for failed units and commercial window repair for businesses managing larger glazing systems. Keeping windows clean is the first step. Keeping them structurally sound is what protects your property long term.

FAQ

What is a window cleaning checklist?

A window cleaning checklist is a structured list of tools, steps, and timing guidelines for cleaning windows thoroughly and without streaks. It covers preparation, cleaning order, technique, and maintenance frequency.

How often should I clean my windows?

Most residential properties need a thorough clean twice per year, in spring and autumn. Properties in urban or coastal areas benefit from up to four cleanings annually due to higher pollution and salt exposure.

What is the best homemade window cleaning solution?

One nickel-sized drop of dish soap per gallon of hot water is the professional standard. This ratio cleans effectively while leaving minimal residue on the glass.

Why do my windows streak after cleaning?

Streaks are most commonly caused by cleaning in direct sunlight, not wiping the squeegee blade after each pass, or using paper towels that create static. Switching to microfiber cloths and cleaning on overcast days resolves most streak problems.

Can I use the same checklist for double glazing?

The core steps apply to double glazing, but you should also inspect the seal between panes during each session. Internal misting between the glass layers indicates a failed seal and requires professional repair, not cleaning.

Ways to improve home insulation: a 2026 guide

Effective home insulation is defined as a whole-house system that combines air sealing, targeted material upgrades, and moisture control to reduce heat loss and lower energy bills. The most effective ways to improve home insulation start with sealing air leaks before adding any new material. Air sealing and insulation upgrades can reduce household heating and cooling costs by 15% to 20%. That figure represents real money back in your pocket every year. This guide covers the top methods, the best insulation materials, and the common mistakes that cost homeowners the most.

1. Seal air leaks before anything else

Sealing air leaks first improves your home’s thermal envelope and makes every other insulation upgrade more effective. Insulation traps air. If that air is constantly being replaced by cold draughts from outside, the insulation cannot do its job. Focus on gaps around window frames, door frames, loft hatches, pipework penetrations, and electrical sockets on external walls. Use caulk for fixed gaps and weatherstripping for moving parts like doors and opening windows. Learning how to seal draughty windows is one of the fastest ways to feel the difference.

Hands applying expanding foam to window frame air leak


2. Upgrade loft or attic insulation

The loft is where most homes lose the greatest proportion of heat. Attic insulation targets often reach R-49 to R-60 depending on climate zone, which is significantly higher than what most older UK homes currently have. Mineral wool rolls are the most common DIY solution and are widely available from builders’ merchants. Lay a second layer at right angles to the first to cover any gaps between joists. Check that you are not blocking eaves ventilation, as airflow prevents condensation building up in the roof space.

3. Insulate cavity walls

Cavity wall insulation is one of the highest-impact upgrades for homes built after the 1920s. A professional installer drills small holes in the external brickwork and injects loose-fill material such as blown-in mineral wool or polystyrene beads. The process takes a few hours and causes minimal disruption. Solid-wall homes require a different approach, either internal dry-lining or external wall insulation boards, both of which are more involved and benefit from professional assessment.

4. Insulate floors and crawl spaces

Suspended timber floors are a significant source of heat loss that many homeowners overlook. Rigid foam boards or mineral wool batts can be fitted between floor joists from below if you have access to a crawl space. For solid concrete floors, rigid insulation boards laid beneath a new screed or floating floor covering are the standard approach. Even laying a thick rug over a cold floor makes a measurable difference to comfort in the short term.

5. Fit an insulating jacket to your hot water cylinder

Fitting an insulating jacket to a hot water cylinder saves approximately £40 annually in energy costs. That saving pays back the cost of the jacket within weeks. A 75mm British Standard jacket is the recommended thickness. This is a straightforward DIY task that takes under 30 minutes. Pipe insulation foam sleeves on the first metre of pipework connected to the cylinder add further savings at minimal cost.

Pro Tip: Insulating pipes and attic hatches provides exceptionally high returns with minimal disruption. These are often paid back within a single heating season.

6. Add draught-proofing and weatherstripping

Draught-proofing is the most cost-effective home insulation technique available to any homeowner. Self-adhesive foam strips fit around door and window frames in minutes. Brush strips work better for the bottom of external doors where foam compresses too quickly. Keyhole covers, letterbox draught excluders, and chimney balloons for unused fireplaces all contribute to a noticeably warmer home. For a thorough approach to draught-proofing your windows, the difference is felt immediately after the work is done.

7. Repair or upgrade double glazing

Failing window seals allow warm air to escape and cold air to enter, undermining every other insulation effort in the house. A misted or cloudy pane is the clearest sign that the sealed unit has failed. Replacing the glass unit rather than the entire frame is a cost-effective fix that restores the insulating performance of the window. Understanding how windows impact insulation helps you prioritise which windows to address first based on their size, orientation, and condition.

8. Install reflective foil behind radiators

Reflective foil behind radiators reflects heat back into the room rather than letting it conduct through the external wall. This is especially effective where radiators are mounted on external walls, which is common in older UK homes. Purpose-made radiator reflector panels are inexpensive and require no tools to fit. The improvement in room warmth is noticeable, particularly in rooms that have always felt cold despite the heating being on.

9. Use expanding foam for hard-to-reach gaps

Expanding polyurethane foam fills irregular gaps that caulk and weatherstripping cannot reach. Common applications include gaps around soil pipes, where cables enter the building, and around loft hatch frames. The foam expands to fill the void and sets hard, creating a permanent air seal. Trim any excess with a sharp knife once cured. Use low-expansion foam around window and door frames to avoid distorting the frame.

10. Insulate the loft hatch

The loft hatch is one of the most overlooked areas in any home insulation project. Many homeowners overlook secondary areas like attic hatches yet gain quick returns from these low-cost improvements. Glue rigid insulation board to the top of the hatch to the same depth as the surrounding loft insulation. Fit a draught-proof seal around the frame. This single task can be completed in under an hour and prevents a significant column of warm air from rising directly into the cold loft.

How to prioritise insulation improvements using an energy assessment

A professional energy assessment identifies the specific areas of your home losing the most heat, so you spend money where it counts. The assessment typically involves a visual inspection, thermal imaging, and a blower door test that measures air leakage across the whole building. The results tell you your current insulation levels, your approximate R-values, and the biggest sources of heat loss ranked by impact.

  1. Book a professional energy assessment. A qualified assessor will produce a report showing heat loss by area and recommend upgrades in order of return on investment.
  2. Measure existing insulation depth. In the loft, use a ruler. Less than 270mm of mineral wool means you are losing significant heat through the ceiling.
  3. Identify the biggest air leaks. Thermal imaging shows cold spots around windows, doors, and wall penetrations that are invisible to the naked eye.
  4. Consider your home’s age and construction. Solid-wall homes built before 1920 need specialist advice. Standard cavity wall techniques do not apply and can cause moisture problems.
  5. Prioritise loft before walls before floors. Heat rises, so the loft delivers the fastest return. Walls come second. Floors third, unless the floor is particularly cold or uninsulated.
  6. Combine air sealing with every insulation upgrade. A whole-house systems approach combining air sealing, insulation, moisture control, and ventilation delivers the best results.

A step-by-step guide to energy-efficient window upgrades can help you integrate window improvements into your wider assessment findings.

Comparing the best insulation materials for your home

Choosing the right material depends on where you are insulating, your budget, and whether you are doing the work yourself or hiring a professional. Installation quality trumps raw R-value in thermal performance. A perfectly fitted lower-grade material outperforms a poorly fitted premium one.

Material Best use Approximate R-value per 25mm DIY friendly Relative cost
Mineral wool rolls Loft, stud walls 0.44 Yes Low
Fibreglass batts Loft, floor joists 0.43 Yes Low
Loose-fill cellulose Cavity walls, loft top-up 0.40 Partial Low to medium
Rigid foam boards External walls, floors 0.70–1.00 Partial Medium
Spray foam Awkward gaps, roof rafters 0.80–1.10 No High
Reflective foil Behind radiators, roof spaces Varies Yes Very low


Mineral wool and fibreglass batts suit most DIY loft and floor projects. Rigid foam boards are the best choice for external wall insulation where space is limited. Spray foam delivers the highest R-value per millimetre but requires a professional installer and can complicate future mortgage valuations if misapplied in roof spaces. Loose-fill cellulose is an excellent, environmentally lower-impact option for topping up loft insulation or filling cavity walls.

Pro Tip: Not all insulation types suit every home area. Always check the manufacturer’s guidance for the specific application before purchasing.

Common mistakes that reduce insulation effectiveness

Poor insulation decisions waste money and can damage your home. Knowing what to avoid is as important as knowing what to do.

  • Skipping air sealing. Adding thick insulation without sealing gaps first is the single most common mistake. Cold air bypasses the insulation and the thermal performance drops sharply.
  • Ignoring secondary areas. Pipes, hot water cylinders, and loft hatches are frequently missed. These areas offer high returns with minimal effort.
  • Installing insulation without addressing ventilation. Poor insulation and ventilation can cause moisture buildup, mould risk, and structural damage. Every sealed home needs controlled ventilation.
  • Using double vapour barriers. Trapping moisture between two vapour barriers causes condensation and rot. Use one barrier on the warm side of the insulation only.
  • Compressing insulation. Compressed mineral wool or fibreglass loses R-value rapidly. Always allow the material to fill the full cavity depth without being squashed.
  • Assuming more is always better. Gaps or compressed fibres negate benefits regardless of material R-value. Coverage and fit matter more than thickness alone.
  • Neglecting professional advice for older homes. Solid-wall or heritage homes need specialist guidance to avoid moisture entrapment and building damage.

For homes where windows are a known weak point, understanding why window seals matter helps you address that area as part of a wider insulation plan.

What 20 years of insulation work has taught us at Cloudy2Clear Windows

The homeowners who get the best results are the ones who treat insulation as a system, not a series of individual jobs. The most common mistake we see is spending money on new insulation material while leaving obvious air leaks untouched around window frames and door thresholds. The cold air simply finds another way in.

The quickest wins are almost always the cheapest ones. An insulating jacket on a hot water cylinder, foam strips around a draughty back door, reflective panels behind radiators on external walls. These tasks cost very little and pay back fast. Yet they are routinely skipped in favour of more visible projects.

Windows deserve more attention than most homeowners give them. A failed double glazing seal does not just look unsightly. It creates a cold spot that chills the room and drives up heating costs. Repairing the sealed unit is nearly always cheaper than replacing the whole window, and the insulating performance is fully restored.

My honest advice: get a professional energy assessment before spending anything significant. It removes the guesswork and tells you exactly where your money will have the greatest impact. Then work through the list methodically, starting with air sealing, moving to loft insulation, and addressing windows and walls as budget allows.

How Cloudy2Clear Windows can help with your insulation improvements

Windows are one of the most significant sources of heat loss in any home, and failed double glazing seals make the problem worse. Cloudy2Clear Windows has been repairing and replacing double glazed units across the UK since 2005, helping homeowners reduce draughts and improve thermal comfort without the cost of full window replacement.

https://www.cloudy2clearwindows.co.uk


Whether you have misted panes, failed seals, or windows that let in cold air, the Cloudy2Clear Windows team can assess and repair the problem quickly. Find your nearest specialist and book an inspection through the Milton Keynes double glazing repairs page, or check availability in your area across the full network of local branches. Addressing your windows alongside your wider insulation plan gives you a complete thermal envelope and a noticeably warmer home.

FAQ

What is the most effective way to improve home insulation?

Sealing air leaks before adding insulation is the most effective first step. Air sealing and insulation upgrades together can reduce heating and cooling costs by 15% to 20%.

How do I know if my home needs more insulation?

A professional energy assessment using thermal imaging identifies cold spots, air leaks, and areas where insulation is absent or insufficient. In the loft, less than 270mm of mineral wool is a clear sign more is needed.

What is the cheapest insulation improvement I can make?

Fitting draught-proofing strips around doors and windows costs very little and delivers an immediate improvement in warmth. Fitting an insulating jacket to a hot water cylinder saves approximately £40 per year.

Can I insulate my home myself or do I need a professional?

Loft insulation, draught-proofing, and hot water cylinder jackets are straightforward DIY tasks. Cavity wall injection, spray foam, and insulation in solid-wall or older homes require a professional to avoid moisture and structural problems.

Does repairing double glazing improve insulation?

Yes. A failed double glazing sealed unit loses its insulating gas fill and allows heat to conduct through the glass. Replacing the glass unit restores the original thermal performance and removes cold spots near windows.