• USP Logo Icon
    25 Year Guarantee
  • USP Leaf Icon
    Latest ECO Friendly Technology
  • USP Pointer Icon
    National Coverage
Get a FREE quote

Stop 80% of Conservatory Heat: UK checklist before a roof upgrade

Shade the glazing before midday, ventilate during the cool hours, add fans or correctly sized air conditioning only if you still cannot use the room, and treat a roof or glazing upgrade as a last resort rather than a first move. Each step typically knocks a few degrees off peak heat, but shading alone often makes the biggest difference. If the room stays unusable after trying all three, Cloudy2Clear Windows can inspect the roof and glazing and advise on realistic options.

Why does my conservatory get so hot?

Roof glazing does most of the damage. In many conservatories, up to 80% of summer solar heat enters through the roof rather than the side windows, which is why fixing the walls alone rarely solves the problem.

Once that heat is inside, it does not just disappear when the sun moves round. Dark floors, heavy sofas and thick curtains soak it up during the day and release it slowly in the evening, which is why a conservatory can still feel stuffy at 9pm even with every window open.

Orientation matters more than most homeowners realise. A south or west-facing room takes the strongest, longest exposure, and a conservatory projecting beyond a certain distance from the house may lose the shade the main building would otherwise provide during peak summer months.

Two technical terms are worth knowing before you start fixing anything:

  • U-value: measures how much heat escapes through glass or roofing. Lower is better for keeping warmth in during winter.
  • Solar control coating: a thin layer on the glass that reflects some solar energy before it enters, reducing heat gain without needing tinted or dark glass.

Quick fixes to try this week

Start with the roof, not the walls. Since most heat comes through the roof glazing, that is where shading pays off fastest.

  1. Fit or close roof blinds early. Pleated or thermal-lined roof blinds block heat at the source. Closing them before the heat of the day builds works far better than trying to cool a room that has already heated up.
  2. Add solar-control window film. Film applied to glass reflects a portion of incoming solar energy and typically lasts several years, though it suits flat glazed panels better than curved or polycarbonate roofs, where fitting is trickier and less reliable.
  3. Install external shading. Awnings, pergolas or sail shades stop heat reaching the glass in the first place, which tends to outperform internal blinds alone because the glazing itself never gets hot.
  4. Swap dark furnishings for lighter ones. Pale, low-thermal-mass flooring such as porcelain or light stone stays cooler than dark tiles or wood, and moving heavy dark rugs and upholstery elsewhere reduces evening radiant heat.
  5. Use plants for partial shade. Tall potted plants near the glazing can take the edge off direct sun and add a little cooling through moisture release, though they will not solve serious overheating on their own.

Pro Tip: Set roof blinds to close automatically by mid-morning in summer rather than waiting until the room already feels hot. Cooling a room after it has heated up takes far longer than preventing the heat in the first place.

Comfort is not just about the thermometer reading. Air temperature, radiant heat off warm surfaces, and glare from bright glazing all combine to make a room feel unbearable, which is why tackling floors and furnishings alongside shading often produces a bigger improvement than either measure alone.

Conservatory furnishings absorbing afternoon heat

Ventilation and low-cost cooling: what actually works

Ventilation only earns its keep once you have already cut the solar gain. Cross-ventilation and roof vents create a chimney effect that pushes hot air out through the roof while drawing cooler air in low down, but that only works well after blinds or film have reduced how much heat is entering to begin with.

  • Open low and high windows together in the early morning and again after sunset, when outside air is cooler than the room.
  • Fit roof vents or automated vents that open on a timer or thermostat, useful if you are often out during the hottest part of the day.
  • Use freestanding or ceiling fans to keep air moving; they cost little to run and help the room feel several degrees cooler than the thermometer suggests.
  • Consider an extractor fan for a quick, targeted way to clear trapped heat, particularly useful if the conservatory has no opening roof vent.

None of this fixes a conservatory baking under direct midday sun with the blinds open. Ventilation moves air around, it does not stop solar gain, so treat it as the second step, not the first.

For more detail on positioning openings correctly, see our guide to improving ventilation in your home this summer.

Is air conditioning worth it for a conservatory?

Air conditioning helps, but only once the room’s heat load has been brought under control first. A unit sized for a normal living room will struggle in a heavily glazed conservatory pulling in strong solar gain, because the unit spends most of its energy fighting incoming heat rather than cooling the air already inside.

Portable units are the cheaper option upfront, but they generally underperform in heavily glazed rooms and run noisier than a properly installed system. A wall-mounted split system costs more to fit but cools more evenly and quietly, and suits a conservatory used daily rather than occasionally.

Where each option fits best:

  • Portable unit: occasional use, smaller conservatories, low upfront budget.
  • Split system: daily use, larger or south-facing rooms, longer-term investment.

The running cost gap between the two widens considerably in a poorly shaded room, since the compressor works harder for longer. Reducing solar gain first lowers the AC capacity you actually need, which cuts both the purchase cost and the electricity bill.

The practical order is always the same: shade and ventilate first, then size an AC unit to what remains, not the other way round.

When is a roof or glazing upgrade actually justified?

If the room is still unusable on warm days after shading, ventilation and mechanical cooling, the glazing itself is probably the limiting factor. That is the point to consider a structural upgrade rather than another quick fix.

Look out for these signs before spending on shading products again:

  • Rooms that stay above comfortable temperature even with blinds closed all day.
  • Condensation in the conservatory roof during cooler months, suggesting poor insulation as well as poor solar control.
  • A polycarbonate or single-glazed roof more than ten to fifteen years old.

Specialist solar-control glass or a hybrid insulated roof can cut heat gain substantially. Some sources report reductions of up to around 70% in favourable cases when high-performance glass replaces older glazing, though actual results depend heavily on orientation and existing roof condition. The trade-off worth understanding: lower U-value glass keeps the room warmer in winter too, so a well-specified upgrade improves comfort year-round, not just in July. Expect the work to take a few days once ordered, and always get at least two written quotes before committing.

How do I choose a reliable conservatory installer?

Getting the right tradesperson matters as much as picking the right product. Work through this before signing anything:

  1. Ask for insurance details and recent references. A reputable installer will provide both without hesitation.
  2. Request product datasheets. These should state U-values and solar control specifications in writing, not just a verbal promise of “cooler glass.”
  3. Ask what temperature improvement to expect. A credible installer gives a realistic range based on your roof’s current condition, not a blanket guarantee.
  4. Confirm warranty length and who handles building regulations. Roof replacements sometimes require sign-off, and the installer should manage this, not leave it to you.
  5. Book a site inspection before agreeing to anything. A proper inspection checks existing U-values, roof pitch, orientation and current glazing condition.

Watch for red flags: no written product data, vague timelines, or pressure to buy an expensive full roof replacement before anyone has actually inspected your conservatory.

Pro Tip: Never accept a quote for a full roof upgrade without an inspection first. A qualified installer can often tell within minutes whether shading and ventilation would solve the problem for a fraction of the cost.

Cloudy2Clear Windows: what we do and why we can help

Established in 2005, Cloudy2Clear Windows has specialised in conservatory and double-glazing repair and replacement ever since. Services relevant to overheating include glass replacement, solar-control glazing upgrades, conservatory roof solutions and full site surveys. An inspection checks your existing glazing’s U-value, roof condition and orientation before recommending anything, so you only pay for the fix your conservatory actually needs.

A practical view on fixing an overheating conservatory

The order matters more than the products themselves: shade first, ventilate second, add mechanical cooling only if the room is still unusable, and treat a roof upgrade as the final step, not the first phone call. Test the cheap fixes for a fortnight before spending on anything structural. If you do decide on glazing work, book it in autumn or winter. Installers are far less stretched outside the summer rush, and you will have the new roof ready well before next year’s heat arrives.

Book a conservatory inspection with Cloudy2Clear Windows

If blinds, ventilation and fans have not solved the problem, the next sensible step is a proper inspection rather than another guess. Cloudy2Clear Windows surveys the existing glazing and roof condition, checks U-values against what the room actually needs, and only then recommends glass replacement, a solar-control upgrade, or a full roof solution, so you are never paying for more than your conservatory requires.

Cloudy2clearwindows


Our teams cover branches including Milton Keynes and Oxford, and homeowners further afield can browse our double glazing glass replacement service for details on what an upgrade typically involves. Get in touch to book a site visit; our team is available Monday to Friday, 8:30am to 6:30pm, to arrange an inspection and a written quote.

Sources

FAQ

How do I stop my conservatory from getting so hot?

Close roof blinds before midday, add solar-control film or external shading, then ventilate during cooler hours. Add fans or correctly sized air conditioning only if the room is still uncomfortable afterwards.

What is the ten-year rule for conservatories?

There is no single universal “ten-year rule” in UK building regulations; conservatories over ten to fifteen years old more commonly have outdated single glazing or polycarbonate roofing, which is why that age range is often flagged as a sensible point to have the glazing inspected.

How do you cool down a glass conservatory quickly?

A fan will make the space feel noticeably cooler even before the air temperature drops.

What is the average lifespan of a uPVC conservatory?

A well-maintained uPVC conservatory frame typically lasts several decades, though the glazing and roofing often need attention or replacement well before the frame itself does, particularly if solar control was never specified originally.

Is it worth upgrading to solar control glass?

If shading, ventilation and mechanical cooling still leave the room unusable on warm days, solar control glass is worth considering.

UPVC window handle stuck? How to free it safely

Most stuck uPVC window handles come down to a mechanical or alignment fault, not a broken window, so you can usually try a safe fix before calling anyone out. Start by moving the handle gently to its open position and checking whether it feels stiff, jams part-way, or spins with no resistance at all. If it spins freely or you feel real resistance building, stop. That is your cue to bring in a professional rather than risk snapping the handle or the mechanism inside the frame.

Quick safety checklist before you touch a stuck uPVC window handle

Before you pick up a single tool, spend two minutes working out what you’re dealing with. A stuck uPVC window handle usually falls into one of a few categories, and rushing in without checking first is how handles get snapped off.

  1. Test the handle through its full range with the window open slightly, if you can get it open at all, and note whether it moves stiffly, partially, or spins with no resistance.
  2. Protect the frame with a folded piece of cardboard or a cloth anywhere a tool might touch the uPVC, since bare metal against the frame will scratch or dent it.
  3. If the sash is heavy or awkward, get someone to hold it steady while you work, particularly on upper floors or large casement windows.
  4. Set aside enough time and gather your tools before you start, rather than stopping halfway to go hunting for an allen key.

This short check tells you whether you’re dealing with dirt and stiffness, or something more serious like a failed gearbox, before you commit to any repair attempt.

What your handle’s behaviour is telling you

Reading the symptoms correctly saves you from fixing the wrong problem. uPVC window hardware tends to fail in a handful of predictable ways, and each one leaves a slightly different clue.

  • Stiff handle that moves but resists: usually dirt, dried-out lubricant, or a sash that’s catching on its keeps rather than turning freely.
  • Handle turns but nothing happens to the locks: almost always a sign the gearbox or the spindle connecting handle to mechanism has failed internally, according to trade advice from Checkatrade.
  • Window locks fine when open but won’t lock shut: points to sash drop or misaligned keeps, where the shootbolts simply aren’t lining up with their catches any more.
  • Visible corrosion, a missing mushroom cam, or loose handle screws: a physical fault you can often see just by looking closely at the edge of the sash and the handle baseplate.

If the handle spins with almost no resistance and the locks don’t move at all, treat that as a strong signal of gearbox or espagnolette strip failure rather than something you can lubricate your way out of.

Step-by-step: opening a jammed uPVC window using a right-angled tool

When the handle won’t budge and the window is properly jammed shut, trade guides recommend a specific manual override that pulls the shootbolt rollers back by hand.

  1. Turn the handle to the open position first, so any shootbolts that are still working release on their own.
  2. If there’s no gap at all, gently prise a small opening with a flat screwdriver wrapped in cardboard to protect the frame finish.
  3. Slide a right-angled tool, a bent allen key or a length of stiff wire, past the rubber seal at the point where a shootbolt roller sits along the sash edge.
  4. Rotate the tool through 90 degrees to hook behind the roller cam, then pull firmly towards the handle side to drag the shootbolt back into its housing.
  5. Repeat the same manoeuvre at the opposite end of the sash if both top and bottom shootbolts have seized.
  6. Remove the handle itself with a screwdriver if you need more room to see or reach the mechanism.

Stop immediately if you can’t reach the rollers, if the handle suddenly starts spinning freely, or if continuing risks snapping the handle or the roller cams. Community DIY discussions on r/DIYUK echo the same approach, and most people who succeed practise the hooking motion on a similar window first.

Pro Tip: Keep the tool angle shallow and pull steadily rather than yanking. A sharp jerk is exactly how roller cams shear off inside the track, turning a five-minute fix into a parts replacement.

Simple DIY fixes once the window is open

With the sash open, you’re in a much better position to sort out the underlying stiffness rather than just freeing it this once.

  • Brush out loose grit and old grease from the shootbolt track and keeps, then wipe with warm soapy water and dry thoroughly before doing anything else.
  • Apply a PTFE or silicone-based lubricant to the cams, keeps, and hinge points rather than a general solvent spray.
  • Tighten the two screws holding the handle baseplate, and check the spindle underneath for wear or rounding.
  • If the sash has dropped slightly, loosen the keeps, realign them with the shootbolts, and ease the hinges before retightening everything.

Products like WD-40 shift immediate stiffness, but trade advice consistently warns against relying on solvent sprays long term, since they attract dust and grime that leaves the mechanism worse off within weeks, as Ross-Dean Locksmiths points out. Silicone or PTFE lubricant, applied every few months, does the job without that build-up. Our own guide to maintaining double-glazed windows covers the same lubrication routine in more depth if you want a seasonal checklist.

When the gearbox or espagnolette strip itself has failed

Cleaning and lubrication won’t fix a handle that spins with zero resistance, because that’s a sign the internal gearbox has stripped or the espagnolette strip inside the frame has failed. This is a distinct problem from dirt or misalignment.

  • A gearbox that’s genuinely failed lets the handle turn freely without any of the shootbolts moving at all.
  • Replacing it involves removing the handle, unscrewing the faceplate, sliding out the old gearbox and strip, then fitting the matched replacement, though this is a job best left to a confident DIYer or a professional, since getting it wrong is easy.
  • Matching parts correctly matters more than people expect: fitting the wrong gearbox profile can leave the handle sitting at the wrong angle or failing again within weeks, as Checkatrade notes.
  • Refitting a gearbox without functioning shootbolts is only ever a stopgap, not a real fix, and leaves the window insecure.

Pro Tip: If you order a replacement gearbox yourself, measure the backset and strip length exactly. A few millimetres out and the handle won’t sit flush against the frame.

Tools and materials worth having to hand

You don’t need a full toolbox for most of these jobs, just a handful of the right items.

  • A bent allen key or a purpose-made right-angled pick for reaching shootbolt rollers.
  • A small flat screwdriver, a basic screwdriver set, and a pair of pliers.
  • PTFE or silicone spray or grease, clean rags, and cardboard or a soft cloth to protect the frame.
  • A few spare handle screws in case the originals strip or corrode.

Avoid metal chisels or anything abrasive near the uPVC finish, and steer clear of solvent-based sprays as a permanent lubricant, for the same grime build-up reasons covered above.

When to stop and call a professional

Some faults simply aren’t worth pushing through on your own, and knowing where that line sits protects both your window and your window insurance.

  • Stop immediately if: the handle spins with no resistance, you can’t reach the shootbolt rollers at all, forcing it risks snapping hardware, or the window’s security matters for an insurance claim or a rented property.
  • A professional visit typically includes: a proper diagnosis of whether it’s the gearbox, spindle, or keeps at fault, and most repairers carry common gearboxes and handle sizes to fit a matched replacement on the same visit.
  • What to expect on cost: most faults turn out to be repairable rather than requiring a full window replacement, so ask for a quoted parts-and-labour price before work starts rather than an open-ended estimate.

If you’d rather skip the diagnostics entirely, our window lock, hinge and handle repair service covers exactly this kind of fault.

Cloudy2Clear Windows: decades of hands-on repair experience

Cloudy2Clear Windows has repaired and replaced window hardware across homes and businesses since 2005, matching gearboxes and espagnolette strips correctly the first time rather than pushing customers towards unnecessary full window replacements.

A step-by-step way to diagnose exactly what’s wrong

Working through symptoms in order stops you fixing the wrong thing, which is the single biggest time-waster in uPVC handle repairs.

Step-by-step diagnostic process for stuck uPVC window handle


Start here: can you turn the handle at all?

If it won’t move even slightly, the issue is almost certainly mechanical resistance inside the frame, dirt, a dry mechanism, or a dropped sash catching on its keeps. Move to the cleaning and lubrication steps above before trying to force anything.

If the handle turns but feels stiff or gritty, that’s your dirt-and-lubrication signature too, just further along. Clean, dry, and lubricate before doing anything else.

If the handle turns smoothly with genuinely no resistance and nothing happens at the locks, stop diagnosing casually and treat it as a gearbox or spindle failure. Check for a visibly stripped spindle at the handle baseplate, since that’s sometimes the actual culprit rather than the gearbox itself, and a stripped spindle is a cheaper fix.

If the window locks fine when it’s already open but won’t pull shut and lock, look at the keeps along the frame edge. Sash drop is the likely cause, and you’re looking at realignment or a hinge adjustment rather than any part replacement.

If you’ve been through all of that and the shootbolts themselves seem physically seized in their housings, that’s when the right-angled tool method described earlier comes in, working the rollers free manually before you touch anything else.

How to remove the handle to inspect or replace parts inside

Getting the handle off cleanly gives you a proper look at the spindle and the top of the gearbox mechanism, and it’s simpler than most people expect.

Turn the handle to the position it would sit in when the window is unlocked, since most uPVC handles only release their fixing screws in this position. Look under the handle’s decorative baseplate, sometimes called the rose, for two small screws, usually a Phillips or a security Torx head. On some designs, you’ll need to lift or rotate the rose slightly first to expose them.

Hands removing screws from uPVC window handle baseplate


Undo both screws fully but keep them somewhere you won’t lose them, then lift the handle straight away from the spindle. The spindle itself, the square metal rod that runs into the gearbox, should come away with the handle on some models or stay in the frame on others. Check it for rounding at the corners, since a worn spindle is a common and cheap-to-fix cause of a handle that turns without engaging anything.

With the handle off, you can see the top of the gearbox faceplate and confirm whether it’s corroded, cracked, or simply gunked up with old grease. Refit by reversing the process, making sure the spindle seats fully into the gearbox before you tighten the screws, otherwise the handle will feel loose or fail to engage properly.

Maintenance tips to stop the handle jamming again

A handle that’s just been freed will seize again within a year or two without a bit of ongoing care, and the fixes are genuinely minor.

Regularly apply PTFE or silicone lubricant to the shootbolts, keeps, and hinges, ideally at seasonal changes when temperature swings affect the frame most. Wipe down the track and seals with warm soapy water first so you’re not just trapping grit under fresh grease. Check the handle screws for tightness at the same time, since a slightly loose baseplate puts uneven pressure on the spindle and speeds up wear.

Keep an eye on how the window closes through the year. If you notice the sash starting to catch or need extra force to lock, deal with the alignment straight away rather than waiting for it to seize completely, since a small adjustment now is far easier than a jammed handle later. Our guide on keeping uPVC frames clean without causing damage covers the cleaning side of this routine in more detail.

Our take: most stuck handles are simpler than homeowners assume

The conventional advice on stuck uPVC handles tends to jump straight to “call a professional,” which oversells the difficulty. Most cases genuinely are dirt, dry mechanisms, or minor misalignment, and a homeowner with a bent allen key and twenty minutes can resolve them without ever touching a gearbox.

Where we think people go wrong is the opposite mistake: forcing a handle that’s already telling them, through zero resistance, that the gearbox has failed. That’s not stubbornness paying off, that’s how a £15 part replacement becomes a broken handle and a call-out anyway. The behaviour of the handle is the diagnosis. Trust it.

Prioritise reading the symptom correctly before reaching for any tool. Clean and lubricate first, because that solves more cases than people expect. And treat a freely spinning handle as a stop sign, not a challenge.

If you’d rather leave it to a professional

If the handle spins freely, the shootbolts are out of reach, or the fault touches on window security for insurance purposes, this is exactly the point where a professional visit earns its cost. Cloudy2Clear Windows technicians carry common gearboxes and matched espagnolette strips, so most repairs are diagnosed and completed on the same visit rather than requiring a return trip.

Cloudy2clearwindows


On site, a technician checks the handle, spindle, gearbox, and keeps, confirms the exact part needed, and gives you a parts-and-labour price before starting work, rather than an open-ended estimate. That upfront pricing, and having the correct part on the van already, is the real difference between booking a professional and gambling on an online part order that might not match your frame profile. If you’re near Milton Keynes, you can check availability through our Milton Keynes branch page, or book directly through our window lock, hinge and handle repair service to get a technician out this week.

Sources

For diagrams and step photos, see the right-angled tool method and uPVC lock troubleshooting guides referenced throughout this article.

FAQ

How do I open a window handle that’s stuck?

Turn the handle to the open position, then use a right-angled tool such as a bent allen key to hook and pull the shootbolt roller cams free from their housings.

Can you use WD-40 on a stuck window?

WD-40 can loosen an immediately stiff handle, but it’s not a good long-term lubricant since the solvent attracts grime; use PTFE or silicone lubricant for ongoing maintenance instead.

Why is my uPVC window handle not engaging?

A handle that turns but doesn’t move the locks almost always means the internal gearbox or spindle has failed, which typically needs a matched replacement part rather than a new window.

How do I fix a stuck uPVC window lock?

Clean out grit, lubricate the cams and keeps with silicone or PTFE spray, tighten the handle screws, and realign the keeps if the sash has dropped; call a professional if the handle spins freely.

When should I call a professional instead of fixing it myself?

Stop and call a professional if the handle spins with no resistance, the shootbolts are inaccessible, or the window’s security affects an insurance condition, since forcing it risks breaking the mechanism entirely.

Fixing a loose uPVC door handle: causes and quick repairs

Four faults cause nearly every loose or floppy uPVC door handle: loosened fixing screws, a failed spring cassette, a worn spindle, or a failing multipoint gearbox. Test it first with the door open. Move the handle up and down. If it wobbles side to side or feels floppy at rest, tighten the two internal fixing screws on the backplate before you do anything else, since vibration and daily use are the most common reason screws work loose over time.

That quick fix solves a large share of cases. But a wobbly handle is also a security issue, not just an annoyance: a loose or floppy handle can fail to fully lift the locking bolts into the keep, leaving your multipoint lock only partially engaged even when the door looks shut.

Before you reach for a screwdriver, know what you’re likely dealing with:

  • Loose fixing screws — the handle wiggles but the mechanism inside still feels smooth.
  • Failed spring cassette — the handle drops and stays down instead of springing back to horizontal.
  • Worn spindle — the handle turns but doesn’t grip the mechanism properly, often rounding off over years of use.
  • Failing gearbox — the handle feels stiff, crunchy, or inconsistent, especially with the door closed.

How to diagnose a loose uPVC door handle in minutes

Work through these checks in order. Each one rules something in or out before you spend money on parts you might not need.

  1. Test with the door open. Lift and lower the handle with the door wide open, away from the frame. If it operates smoothly here but resists or clicks with the door shut, the fault is almost certainly the gearbox or door alignment, not the handle itself.
  2. Run the push-and-release spring test. Push the handle down and let go. A healthy handle springs back to the horizontal rest position on its own. If it stays down, drops slowly, or needs manual help returning, the spring cassette inside the handle has likely failed and the handle itself usually needs replacing.
  3. Wiggle the backplate. Grip the outer plate of the handle and try to rock it. Any movement points to loose fixing screws, or in worse cases, screw holes that have stripped inside the uPVC and no longer grip.
  4. Inspect the spindle. Remove the handle (covered in the next section) and look at the square spindle that connects the two handles through the door. Rounded corners, visible play, or a spindle that spins without turning the mechanism all indicate wear.
  5. Note behaviour differences between open and closed door. If everything checks out with the door open but the handle jams, feels crunchy, or won’t lift fully with the door closed, you’re looking at a gearbox or alignment problem rather than anything wrong with the handle hardware.

Pro Tip: Keep a short note of exactly what the handle does at each stage, “springs back fine open, jams shut”, for example. If you end up calling a locksmith or Cloudy2Clear Windows, that detail cuts diagnosis time dramatically, because it immediately tells the technician whether to start at the handle or the gearbox.

Simple diagnostic tests like these reliably separate loose screws from spring cassette failure, worn spindles, and gearbox faults, which matters because each one needs a different fix.

Step-by-step: tighten and reseat the handle

If your diagnosis points to loose screws or a slightly misaligned backplate, this fix takes about ten minutes and solves the majority of wobbly handle complaints.

What you’ll need:

  • A Phillips #2 screwdriver
  • A small flathead screwdriver (for prising off screw caps)
  • A soft cloth
  • Optional: longer replacement screws or thin plastic wall plugs, in case the existing holes have stripped

The process:

  1. Open the door fully and wedge it, or prop it, so it can’t swing while you work.
  2. Use the flathead screwdriver to gently prise off the small plastic caps covering the two fixing screws on the handle’s backplate. Lay the cloth down first so you don’t lose them.
  3. Loosen both screws slightly rather than removing them completely.
  4. Push the backplate flush against the door, then tighten the screws alternately, a little on one, then the other, rather than fully tightening one side first. This reseats the plate evenly and avoids pinching the internal mechanism, which can make the handle stiff or jam it entirely.
  5. Test the handle through a full cycle (up, down, spring back) before refitting the caps.

If the screws spin without biting, the holes have stripped inside the uPVC. Slightly longer screws or thin plastic wall plugs pushed into the existing holes usually restore enough grip without drilling new holes or replacing the door. Avoid the temptation to overtighten instead. It rarely fixes a stripped hole and can crack the uPVC backplate around the screw.

Once refitted, test properly: close the door, lift the handle fully, and turn the key. If the bolts shoot home smoothly and the door locks without extra force, you’ve solved it. If the handle still feels loose or the lock resists, move on to the spindle and spring checks below.

Hands testing uPVC door handle and key after fix

What if tightening doesn’t fix the wobble?

When the screws are tight but the handle still drops or feels loose, the fault sits deeper, in the spring cassette or the spindle.

Worn spring cassette inside uPVC door handle mechanism


Run the spring test again with the handle removed from the door if possible. A cassette that’s failed internally usually shows a handle that flops freely with almost no resistance, rather than one that springs back with tension. This is the single most common cause of a handle that drops and won’t return to horizontal, and it’s a handle or cassette replacement, not a repair.

To check the spindle, remove both handles (the fixing screws you’ve already located hold the outer handle in place; the inner one usually lifts free once the screws are out). Slide the spindle out and examine it:

  • Look for rounded corners where it should be a crisp square, usually 8mm, the standard size for most uPVC doors.
  • Check for play, if it wobbles inside the gearbox follower even when correctly seated, it’s worn.
  • Confirm it’s centred. Even a spindle sitting fractionally off centre, or one a shade too short, introduces rotational play that no amount of screw tightening will cure.

You can replace just the spindle if the handle itself still feels sound, which is cheaper and quicker. A full handle set makes more sense if the spring cassette has also failed or the handle is cosmetically worn. Either job typically takes under half an hour for someone comfortable with basic tools, and spindles and handle sets are inexpensive compared with a call-out.

Pro Tip: Never force a handle that feels stiff or crunchy, hoping it’ll “loosen up”. Forcing a failing mechanism is one of the most common ways a simple handle problem turns into a snapped spindle follower or a seized gearbox, which costs considerably more to put right.

When the gearbox, not the handle, is the real problem

Replacing the handle sometimes doesn’t fix anything, and that’s usually because the fault was never in the handle at all.

Watch for these signs of a gearbox or alignment issue:

  • The handle lifts smoothly with the door open but sticks, crunches, or resists with the door closed.
  • The locking points engage unevenly, some throw fully, others barely move.
  • A brand new handle still feels stiff or drops after fitting.

Professionals see this pattern often: a homeowner fits a new handle, and the fault returns within days because the gearbox inside the door edge was always the actual problem. The handle was simply showing the symptom, not causing it.

Gearbox replacement or door realignment is a more involved job. It usually means removing the door from its hinges, and getting the multipoint mechanism correctly matched to your door’s keeps and hinges takes trade experience most DIYers don’t have on hand. This is the point where calling a specialist saves you time, money, and a door that won’t lock properly. Delaying it rarely helps. A gearbox under strain tends to fail further rather than settle down, and a door that isn’t locking securely at all points is a security gap worth closing quickly.

Hands removing uPVC door from hinges for repair

Preventing loose handles before they start

A short routine every few months keeps most handle problems from developing at all.

  • Every three to six months, check both fixing screws for movement and tighten if needed.
  • Give the spindle a visual check for wear or play while the handle is off.
  • Confirm the backplate still sits flush against the door with no gaps.
  • Apply a silicone-based or lock-specific lubricant sparingly to moving parts, and avoid heavy oil or grease in the cylinder itself, since it attracts grit and dust that make the mechanism stiffer over time.
  • Keep an eye on how the door closes generally. A door dragging slightly on its hinges puts extra strain on the gearbox even when the handle is fine.

Small, regular maintenance steps like these reduce the chance of a full gearbox failure later, which is a considerably bigger job than tightening two screws. For the wider door and window upkeep that keeps a uPVC installation performing well, our seasonal maintenance guide covers checks worth adding to the same routine.

Cloudy2Clear Windows: what our experience shows and what we inspect

Cloudy2Clear Windows has repaired and replaced door and window hardware across residential and commercial properties since 2005, so handle, lock, and gearbox faults are familiar territory. When a technician arrives for a loose handle callout, they check the same sequence outlined above: spindle fit and wear, spring cassette condition, gearbox action with the door both open and closed, and any sign of stripped fixing holes.

If you’re requesting a quote in advance, a few details speed things up considerably:

  • A short video or photos of the handle being lifted with the door open and closed.
  • The door’s approximate age and whether it’s ever had lock work done before.
  • Whether the key turns smoothly or resists when the door is shut.

Our guide to repairing window locks covers the same diagnostic logic in more depth for anyone dealing with a stiff or misbehaving lock alongside a loose handle.

The conventional advice on this gets it backwards

Most guidance to homeowners starts with “buy a new handle.” That’s the wrong first move, and the evidence in this article shows why. A handle is often the messenger, not the cause. Fit a replacement onto a failing gearbox and you’ll be back where you started within a week, with a new part added to the pile of things that didn’t fix it.

The better order of operations is diagnosis first, cheapest fix first. Tighten the screws. Test the spring. Check the spindle. Only then consider whether the handle itself needs replacing, and only after ruling out the gearbox should anyone start pricing that job. Homeowners who skip straight to buying parts based on guesswork tend to spend more, not less, because they’re paying for hardware that was never the problem.

What we’d urge readers to prioritise is patience with the diagnostic sequence over speed to a fix. A ten minute screwdriver check costs nothing. A wrongly guessed handle replacement costs a part and doesn’t solve a gearbox fault that a locksmith or trade repairer would have spotted immediately.

How Cloudy2Clear Windows can help and how to book a repair

If you’ve worked through the checks above and you’re still looking at a stiff gearbox, a door that won’t lock properly, or a handle that’s dropped again after replacement, that’s exactly the point where a trade visit earns its cost back. Cloudy2Clear Windows carries out lock, hinge, and handle repairs, including gearbox replacement and door realignment, without the guesswork of buying parts that might not be the actual fault.

Cloudy2clearwindows


A typical appointment starts with the same diagnostic sequence covered in this guide, spindle, spring cassette, gearbox, alignment, so most faults are identified on arrival and repaired in the same visit rather than requiring a return trip for parts. For anyone managing a broader glazing issue alongside the door hardware, our double glazing glass replacement service covers misted or damaged panes in the same appointment. Bookings run Monday to Friday, 8:30am to 6:30pm. Get in touch to arrange a technician visit and put an end to the guesswork.

Sources

FAQ

Why is my uPVC door handle floppy?

A floppy handle that won’t spring back to horizontal is almost always a failed spring cassette inside the handle itself, which typically means replacing the handle or the cassette rather than tightening anything.

How do you fix a wobbly door handle?

Tighten the two internal fixing screws on the backplate first, alternating between them so the plate seats evenly, since loosened screws from vibration and daily use are the most frequent cause of a wobble.

What are the common problems with uPVC door handles?

The four recurring faults are loose fixing screws, a failed spring cassette, a worn or rounded spindle, and a failing multipoint gearbox, and each one needs a different fix rather than a blanket handle replacement.

Why is my door handle wiggly?

A handle that wiggles side to side but still operates smoothly usually means loose backplate screws, while a handle that turns without properly engaging the mechanism points to a worn spindle instead.

Can I replace just the spindle instead of the whole handle?

Yes, if the handle itself still springs back correctly and shows no cosmetic wear, replacing only the spindle, commonly an 8mm square fitting, is cheaper and takes under half an hour for most DIYers.

Conservatory roof glass cost: typical UK prices for 2026

A glass conservatory roof in the UK typically costs between £2,000 and £15,000 fitted, with most homeowners settling somewhere in the middle once size, shape and glass spec are factored in. For the standard 12 to 18 square metre conservatory, expect to pay roughly £3,500 to £7,000 for a full supply-and-fit job. Go for a complex shape or top-tier glass and you can expect higher costs.

Here’s the quick breakdown:

  • Budget: £2,000 to £3,500 for smaller, simple lean-to roofs with standard toughened glass
  • Typical: £3,500 to £7,000 for most 12 to 18m² Edwardian or Victorian roofs
  • Premium: £9,000 to £15,000 for large, bespoke shapes with self-cleaning or solar-control glass

The single best recommendation for most UK homes: self-cleaning or solar-control glass. It costs more upfront but earns that money back through lower maintenance and reduced overheating, particularly on south or west-facing rooms.

What does conservatory roof glass cost break down into?

A conservatory roof quote is rarely one flat number. It’s a stack of individual costs, and understanding each one helps you spot a fair price from an inflated one.

Industry price reviews put the overall conservatory roof replacement market between about £2,500 and £12,000, with a typical supplied-and-fitted figure sitting around £6,500. Glass sits at the higher end of that range compared with polycarbonate, but it comes with better clarity, sound insulation and long-term durability.

Here’s how the numbers usually stack up by conservatory size:

  1. 3x3m conservatory (9m²): roughly £2,500 to £4,000 for standard toughened glass, fitted
  2. 4x4m conservatory (16m²): roughly £4,500 to £7,500, depending on glass spec and roof shape
  3. 5x5m conservatory (25m²): roughly £7,000 to £11,000, particularly where the roof includes hips, valleys or a bay

A typical itemised quote should include the glass units themselves, the glazing bars or bar caps that hold them, fitting labour, and new seals and gaskets to stop leaks. What it often excludes is scaffolding access (usually £150 to £400 depending on height and duration), any structural reinforcement to the existing frame, and disposal of the old roof material.

VAT adds 20% on top of most quotes unless you’re VAT-exempt for a specific reason, so always check whether the headline figure you’ve been given is inclusive or exclusive. Waste removal is sometimes bundled in, sometimes charged separately at £50 to £150. If your job needs a building-regulations application, gov.uk publishes the current planning application fees, and it’s worth checking these before you commit to a like-for-like or upgraded specification.

What actually moves the price up or down?

Two conservatories of the same floor area can come back with wildly different quotes. Shape, glass spec, frame condition and where you live all pull the number in different directions.

Various conservatory roof glass and frame cross-section samples


Shape matters more than most homeowners expect. A simple lean-to or Edwardian roof is the cheapest to glaze because the panels are straightforward rectangles. Move to a Victorian, P-shaped or L-shaped roof and you’re commonly paying 15% to 35% more, because those designs need bespoke cuts, hip bars and extra sealing detail around the angles.

Other cost drivers worth flagging:

  • Glass specification (self-cleaning, solar-control or smart glass all carry a premium over standard toughened units)
  • Frame condition, particularly on conservatories over 15 years old where the uPVC or timber may have degraded
  • Access difficulty, such as a roof over an extension or a tight side passage requiring extra scaffolding
  • Regional labour rates, which vary noticeably across the country

On that last point, London and the South East typically command a noticeable premium over the Midlands or North for the same specification of work. If you’re quoting installers in Berkshire versus Nottinghamshire, don’t be surprised if the numbers differ by several hundred pounds on an otherwise identical job.

Pro Tip: Ask every installer to itemise frame reinforcement separately from the glass cost. A frame that looks fine from inside the room can still be out of square or rotten at the corners, and that’s usually where “surprise” costs creep in.

Which glass type gives you the best value?

The glass you choose changes both your upfront bill and what you pay to heat and cool the room for years afterwards. Here’s how the main options compare:

  • Standard toughened glass: the entry point, usually offering acceptable U-values for a room used occasionally rather than year-round. Fine for a garden room or occasional-use space where budget is the priority.
  • Self-cleaning glass: typically adds £1,500 to £2,500 to a roof job. A photocatalytic coating breaks down organic dirt in sunlight and rain washes it away, cutting down on the ladder-and-squeegee routine considerably. Our guide to self-cleaning glass covers how the coating actually works.
  • Solar-control glass: usually adds a further £1,500 on top of self-cleaning, and it’s worth it for any south or west-facing conservatory prone to turning into a greenhouse by mid-afternoon. Our piece on solar control glazing breaks down when the premium pays off.
  • Smart glass: the newest option, priced around £500 to £700 per square metre for the panel alone, tinting electronically to control light and heat on demand.

Set against polycarbonate (cheaper, noisier in rain, prone to yellowing) or a solid tiled roof (better thermal performance but often needing building-regulations sign-off), glass sits as the balanced middle ground for most homeowners: better clarity and light than either alternative, without the regulatory complexity of a full tiled conversion.

What does a real quote look like for a 12m² Edwardian conservatory?

Take a south-facing Edwardian conservatory, 12m², with a frame in good structural condition that’s under ten years old. No reinforcement needed, straightforward access, based in the Midlands.

Glass specification Approximate fitted cost Notes
Standard toughened £3,500 to £7,000 Baseline; likely to overheat in summer
Self-cleaning £3,500 to £7,000 Adds low-maintenance coating
Solar-control £3,500 to £7,000 Reduces heat gain on south-facing aspect
Smart glass £9,000 to £15,000 Electronic tint control, highest spec


The jump from standard to solar-control can be a few thousand pounds, but for a south-facing room that’s used through summer, the reduction in overheating and the corresponding drop in fan or air-conditioning use tends to make that money back over time. Homeowners we speak to who’ve made the switch typically describe a simple payback within around nine years when they factor in reduced cooling costs, though this varies with how the room is used.

How do you get reliable quotes and avoid a bad installer?

Getting three quotes is standard advice, but the questions you ask matter more than the number of quotes you collect.

  1. Ask exactly which glass specification is included — “toughened glass” alone tells you nothing about U-value or coating
  2. Ask who signs off building regulations, if your job needs them, and get this in writing
  3. Ask whether frame reinforcement is included or will be quoted separately once they’ve inspected it
  4. Ask about warranty length and what it actually covers (glass units, seals, workmanship are often separate warranties)
  5. Ask whether the fitters are direct employees or subcontracted, and check their public liability insurance

Red flags include a quote with no breakdown by line item, pressure to sign on the day for a “special discount,” and any installer unwilling to provide references or evidence of insurance. Reputable installers should offer finance options without pushing them, and a warranty of at least 10 years on the glass units is a reasonable minimum to expect.

Pro Tip: If a quote seems significantly cheaper than the others, ask specifically what U-value the glass achieves. A lower-spec pane dressed up in vague language is the most common way quotes get artificially deflated.

When do you need planning permission for a glass roof?

Swapping like-for-like glass, replacing a failed unit with the same specification, generally sits outside planning permission and building regulations in most cases.

  • A straightforward glass-to-glass roof replacement rarely needs sign-off
  • Moving to a solid, tiled roof commonly does trigger building-regulations approval, because it changes the structure’s thermal and structural classification
  • Any structural alteration, such as removing a supporting wall or extending the footprint, usually needs both planning permission and building control
  • Glass and polycarbonate swaps are generally treated more leniently than tiled conversions, which is one reason glass remains the popular choice

Ask your installer directly whether they handle the regulatory paperwork or whether that responsibility sits with you.

What proof points should you look for in an installer?

Cloudy2Clear Windows has been installing, replacing and repairing double glazing across residential and commercial properties since 2005, including conservatory glass, doors, locks and hinges. That length of time in the trade means we’ve fitted glass roofs onto frames in every condition, from newly built extensions to conservatories that hadn’t seen maintenance in over a decade.

A professional service should always include:

  • A proper site survey before any quote is finalised, not a desktop estimate
  • An itemised written quote covering glass, labour, access and any reinforcement
  • Clear warranty terms on both the glass units and the installation work
  • Compliance checks for housing association or commercial properties where relevant

When a frame is out of square or showing rot at the corners, fitting expensive glass onto it without addressing the frame first is money wasted. A proper survey catches this before it becomes an expensive surprise mid-installation.

Why the “cheapest glass” advice usually costs homeowners more

Most cost guides push readers towards the lowest headline figure, and that’s the wrong instinct for a conservatory roof specifically. A conservatory lives or dies on its glass. Get the spec wrong and you’ll either bake in summer or freeze in winter, then spend the savings on fans, heaters or a second renovation five years later.

Why the "cheapest glass" advice usually costs homeowners more — overview diagram


Where conventional advice falls short is treating glass as a single line item rather than a performance decision tied to orientation. A north-facing garden room and a south-facing family space have completely different requirements, yet they’re routinely quoted the same “standard glass” price. That’s backwards.

If you take one thing from this guide, prioritise matching glass spec to your conservatory’s orientation before you even start comparing quotes. Get that right first, then negotiate on price. Homeowners who reverse this order tend to end up with a room they don’t actually want to sit in.

Cloudy2Clear Windows: how we can help and next steps

If you’ve read this far, you already know that getting the glass specification right matters as much as the price on the page. Cloudy2Clear Windows fits and replaces conservatory glass, repairs conservatory windows, and carries out inspection work for homeowners and housing associations alike, so whether you need a full roof replacement or a single cracked pane sorted, it’s the same team handling the job.

Cloudy2clearwindows


Booking starts with a survey, not a sales call. We’ll assess your existing frame, talk through glass options against your conservatory’s orientation, and provide an itemised quote with clear warranty terms before any work begins. Our service hours run Monday to Friday, 8:30am to 6:30pm.

If you’re in the Milton Keynes area and thinking about a conservatory roof glass upgrade, get in touch with our Milton Keynes double glazing team for a survey date. For readers elsewhere, our conservatory window replacement and glass repair page has full details on what a supply-and-fit service includes and how to request a quote.

Sources

FAQ

What type of glass is best for a conservatory roof?

Self-cleaning or solar-control glass suits most UK conservatories, particularly south or west-facing rooms prone to overheating. North-facing rooms can often manage with standard toughened glass or a high-performance low-e option to preserve natural light.

How much does a 3x3m conservatory cost in the UK?

A 3x3m (9m²) conservatory roof in glass typically costs between £2,500 and £4,000 fitted, depending on shape and glass specification chosen.

How much does it cost to replace the roof of a conservatory in the UK?

Conservatory roof replacement in the UK generally costs between £2,500 and £12,000, with glass roofs for a typical 12 to 18m² space most commonly landing between £3,500 and £7,000.

Is a glass roof cheaper than tiles?

Glass roofs are usually cheaper upfront than solid tiled conversions and are less likely to trigger building-regulations sign-off, though tiled roofs can offer better thermal performance in some cases.

How to reduce traffic noise through windows: what actually works

The single most effective fix is a combination: seal every gap around the frame, then upgrade the glazing itself to acoustic laminated glass or secondary glazing. Draught-proofing alone can shave a few decibels off within an afternoon, but glazing upgrades deliver the bulk of the improvement, with acoustic laminated glass typically cutting transmitted noise by 10 to 15 dB more than standard double glazing.

What to expect, in order of impact:

  • Sealing gaps and fitting draught strips: immediate, modest reduction, often the cheapest first move
  • Heavy lined or acoustic curtains: useful buffer, particularly against higher-frequency traffic sound
  • Acoustic laminated glass or secondary glazing: the biggest, most reliable gains
  • A professional survey: worth booking once you’re past quick fixes and want a guaranteed result

If your windows are draughty, cracked, or the seals have perished, that’s the point to call in a specialist rather than keep layering DIY fixes on top of a failing frame — including considering noise-reducing interior door options to complement your window upgrades.

Quick practical steps to reduce traffic noise windows right now

Before spending a penny on glazing, check the cheap wins. A surprising amount of traffic noise sneaks in through gaps most homeowners never think to check.

  1. Inspect the frame edges. Run your hand around the perimeter on a windy day. Any draught you feel is also a noise path. Fill visible gaps with acrylic sealant or replace worn foam strips with brush pile or compression gaskets.
  2. Check the trickle vents and letterbox. Trickle vents left permanently open are a direct acoustic bypass; letterboxes and keyholes do the same job on doors. Acoustic-rated vent covers close the gap without sealing the room shut.
  3. Add heavy curtains or acoustic curtains. A dense, lined curtain hung close to the glass adds real mass, which is what dampens sound. It won’t touch low-frequency lorry rumble much, but it takes the edge off tyre roar and voices.
  4. Try temporary window plugs. Foam or acrylic inserts cut into the reveal can help overnight in a bedroom, though they’re a stopgap, not a permanent answer.
  5. Use furniture and planting as a buffer. A bookcase against an external wall, or dense hedging outside, won’t transform a noisy room, but every small barrier adds up.

It helps to know what kind of noise you’re dealing with. Low-frequency rumble from HGVs travels through mass and gaps that higher-pitched sounds, like car horns or motorbikes, don’t. A noise survey that separates frequency from raw volume will tell you whether your problem is a deep drone or sharper transient noise, and that changes which fix matters most.

Pro Tip: Test your seals with a lit candle on a breezy day. Any flicker near the frame marks a leak worth sealing before you spend money on glazing.

Which glazing upgrade actually stops traffic noise?

Not all glazing performs the same, and pane count alone tells you very little. What matters is the interlayer, the cavity width, and the test data behind the unit.

Close-up of acoustic laminated double glazing


Acoustic laminated glass uses a PVB (polyvinyl butyral) interlayer bonded between two panes of glass, which damps vibration rather than simply adding thickness. Field and manufacturer figures show this construction reaching Rw+Ctr values in the high 30s to mid 40s, against roughly 28 to 32 dB for standard double glazing in lab conditions.

Secondary glazing fits a separate pane, usually within its own slim frame, on the room side of your existing window. Because it creates a wide air gap rather than relying on a single sealed unit, it’s particularly effective for single-glazed or listed properties where planning rules prevent altering the original frame externally.

  • For most homeowners: a well-specified acoustic double-glazed unit often beats generic triple glazing on cost per decibel gained
  • For listed or conservation-area properties: secondary glazing is usually the only realistic route to serious noise reduction
  • For anyone comparing quotes: ask for the Rw+Ctr figure, not just Rw. Rw+Ctr is adjusted for traffic-type noise spectra, which is what you actually want measured

Cavity width matters more than most people realise. Laboratory testing on single, double, and triple glazing configurations found that air gaps under roughly 30mm create a resonance effect that actually weakens low-frequency performance, while wider cavities improve it substantially. That’s precisely why a cheap triple-glazed unit with a narrow gap can underperform a well-designed double-glazed acoustic unit: pane count is a marketing shorthand, not an acoustic guarantee. Insist on a manufacturer test certificate before you commit.

Why frame condition and seals limit your results

Glazing gets the attention, but a poorly sealed frame can undo most of what expensive glass achieves. Even a gap equal to just 1% of the window’s total area can drop measured acoustic performance significantly, because sound finds the path of least resistance long before it tries to pass through glass.

  • Brush pile and compression gaskets hold their shape and seal consistently over years; they’re the standard for a reason
  • Foam strips compress, crumble, and lose contact within a couple of seasons, which is why they’re a false economy for noise control
  • Acoustic trickle vents maintain ventilation while reducing the direct sound path that standard open vents leave behind
  • Frame replacement becomes worthwhile once timber has warped, uPVC has degraded, or seals no longer sit flush against the glass

Pro Tip: If your windows already have decent glazing but noise still gets through, check the frame before blaming the glass. Airtightness is often the real culprit.

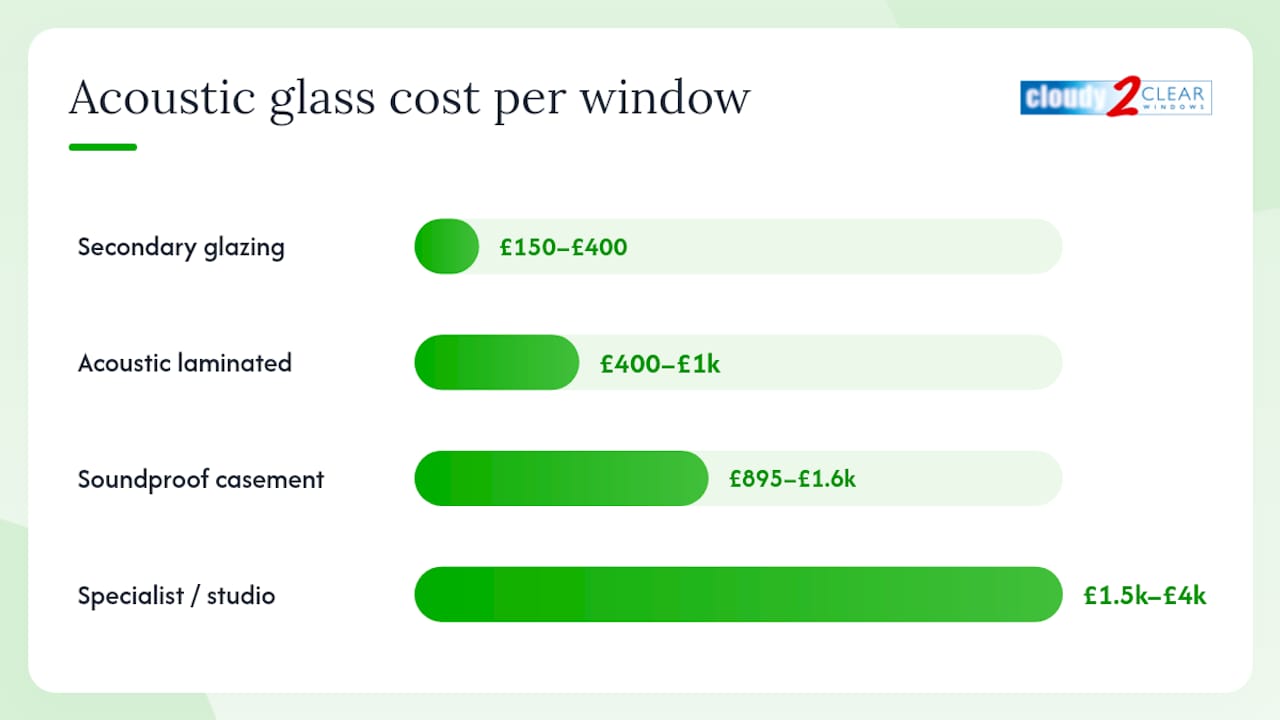
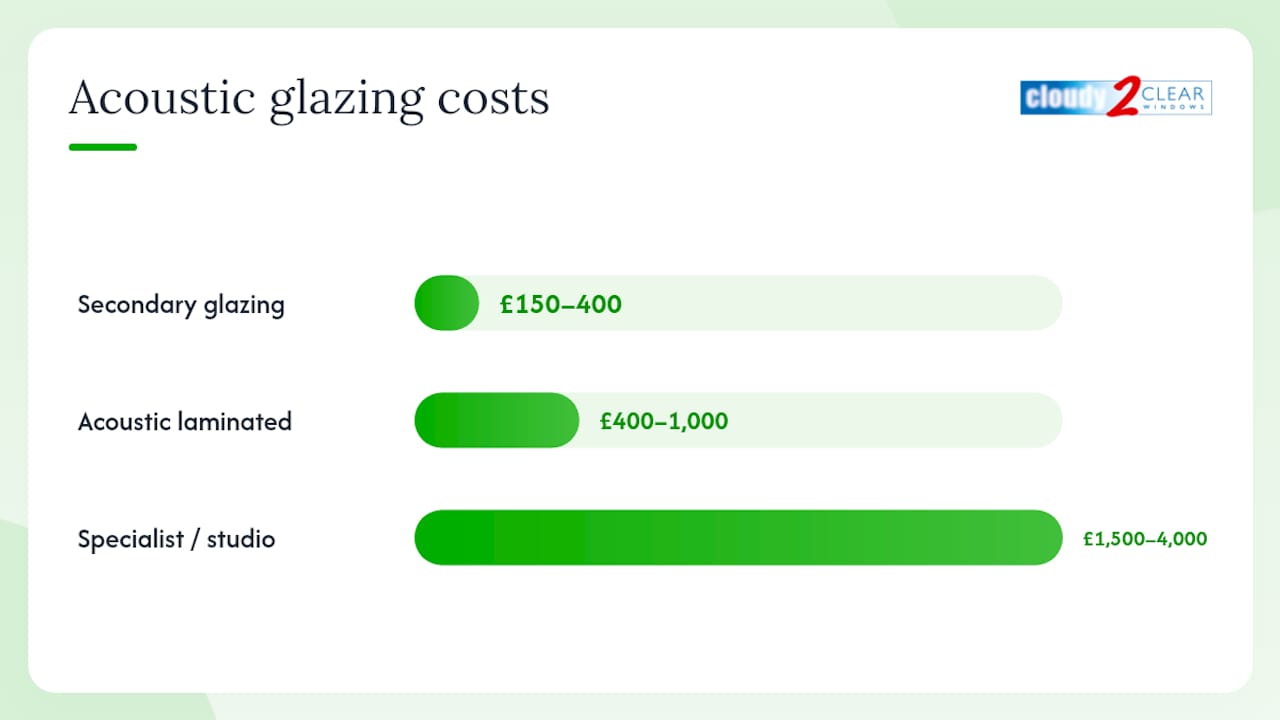
What does it cost, and how much quieter will it feel?

Budgeting for glazing work means weighing installed cost against a realistic, not marketed, decibel gain.

Graph of glazing cost versus noise reduction


A three-bedroom terrace on a busy road, upgrading several front-facing windows to acoustic laminated glass, might involve several thousands of pounds in glazing spend, alongside a noticeable day-to-day drop in perceived noise. That matters more than the raw number suggests: a 10 dB reduction is generally perceived as roughly halving how loud something sounds. Given how consistently national noise surveys flag traffic sound as a genuine quality-of-life complaint, that perceptual shift is often the whole point of the investment.

DIY or professional? How to tell which job is which

Sealing gaps, hanging heavier curtains, and fitting temporary plugs are all sensible DIY territory. Glazing units and secondary glazing systems are a different matter, because a poorly fitted unit leaks sound exactly where you least want it: around the edges.

  1. Draught-proof and re-seal the frame yourself using brush pile strips
  2. Hang lined or acoustic curtains and test the difference for a week
  3. If noise persists, get quotes for acoustic laminated glass or secondary glazing rather than repeating cheaper fixes

Before booking anyone, ask for:

  • Rw+Ctr test certificates for the specific glass unit being quoted, not generic brochure figures
  • FENSA or TrustMark registration, confirming the installer meets recognised building standards
  • Evidence of UKAS-accredited testing behind any acoustic performance claim
  • A written warranty covering both the glass and the installation

Walk away from installers who quote foam-only seals, can’t produce test data, or price well below everyone else with no certification to back it up. That combination almost always means a job that looks fine on day one and underperforms within a year.

An installer’s view on fixing traffic-noise problems properly

Cloudy2Clear Windows has been repairing and upgrading double glazing since 2005, and the pattern is consistent: most noise complaints trace back to frame condition, not just glass. A proper assessment checks:

  • Seal condition and airtightness around every edge
  • Existing Rw+Ctr rating versus what the property actually needs
  • Whether secondary glazing suits the frame better than a full replacement unit

What most advice on this topic gets wrong

Plenty of guides treat triple glazing as an automatic noise-reduction win. It isn’t. As the laboratory data on cavity resonance shows, a narrow air gap can actively undermine low-frequency performance, so a badly specified triple unit can lose to a well-built acoustic double-glazed pane. Pane count is a proxy people reach for because it sounds intuitive, not because it’s the metric that matters.

Close-up of triple glazing narrow cavity detail


The other blind spot is sealing. Homeowners will spend serious money on glass while a perished foam strip quietly cancels out a chunk of the gain. Fix the frame first, or fix it alongside the glass. Doing one without the other is money spent chasing half a result.

If there’s one thing worth prioritising above all else, it’s asking for the Rw+Ctr figure and a genuine test certificate before signing anything. Marketing claims about “soundproof” glazing are common; verified lab data behind those claims is not. That gap between promise and proof is where most disappointing installations come from, and it’s entirely avoidable if you ask the right question before, not after, the invoice.

Ready for a lasting fix rather than another temporary patch?

Cloudy2Clear Windows fits glass-only replacements, acoustic laminated glass, secondary glazing, and frame seal repairs, so you get a measured noise reduction rather than a guess dressed up as a quote.

Cloudy2clearwindows


Every quote comes with genuine Rw+Ctr test data behind the glass specified, backed by decades of installation experience across residential and commercial properties. Unlike a generic “buy triple glazing and hope” approach, you get a solution matched to your actual frame condition and noise problem, with a warranty attached. If a specific window or door in your home is causing more misery than the rest, our window pane and double glazing glass replacement service is the natural next step, and readers near Milton Keynes can get a local quote through our branch page to see real numbers for their property before committing to anything.

Sources

FAQ

How can I soundproof my windows from traffic noise?

Seal every gap around the frame first, then upgrade to acoustic laminated glass or secondary glazing, which together deliver the largest, most reliable reduction rather than relying on curtains or plugs alone.

Will triple glazing stop traffic noise?

Not automatically. Triple glazing with a narrow air gap under roughly 30mm can suffer from resonance that weakens low-frequency performance, so a well-specified acoustic double-glazed unit often outperforms generic triple glazing for traffic noise.

How do I soundproof against traffic noise on a budget?

Draught-proof the frame, add heavy or acoustic curtains, and use temporary window plugs in the meantime, then prioritise a proper glazing upgrade once budget allows, since these quick measures only offer a modest reduction on their own.

Why can I hear everything outside my window?

Usually because of gaps around the frame, open trickle vents, or worn seals rather than the glass itself. Even a gap equal to 1% of the window area can significantly cut acoustic performance, so check airtightness before assuming the glass is the problem.